Introduction #
The Redmineflux Fluxshot is a powerful Chrome extension that seamlessly integrates with Redmine, revolutionizing the way you capture screenshots and create issues right from your browser. With Redmineflux Fluxshot, you can effortlessly provide feedback, report bugs, and update existing issues without ever leaving your current web page.
Version Compatibility #
Redmine Versions
- 4.0.x, 4.1.x, 4.2.x
- 5.0.x
- 6.0.x(coming soon)
Installation #
- Open the Chrome web browser on your computer.
- Go to the Chrome Web Store.
- Search for ” “Fluxshot” ” in the search bar.
- Click on the “Add to chrome” button next to the Fluxshot extension.
- A confirmation dialog will appear. Click on “Add Extension” to proceed.
- Fluxshot will be downloaded and installed on your Chrome browser.
- Please download the Fluxshot plugin also, which is used to save or store issues.
- Make sure you have a working installation of Redmine.
- Download the Fluxshot from the redmineflux.com website. The plugin typically comes in the form of a ZIP file
- Extract the Fluxshot zip file to Redmine’s plugins directory (/path/to/redmine/plugins) and do not change the plugin folder name.
- Run the following command to install the required dependencies
Bundle install
- Run migrate command for database migration
-> In Production
RAILS_ENV=Production bundle exec rails redmine:plugins:migrate
–> In Development
RAILS_ENV=Development bundle exec rails redmine:plugins:migrate
- Restart Redmine server to load the plugin
Rails s
Configuration #
- Open a web page that you want to capture or work with.
- Locate the FluxShot extension icon in the Chrome toolbar (usually located in the top-right corner).
- Click on the FluxShot icon to open the extension and capture the screenshots .
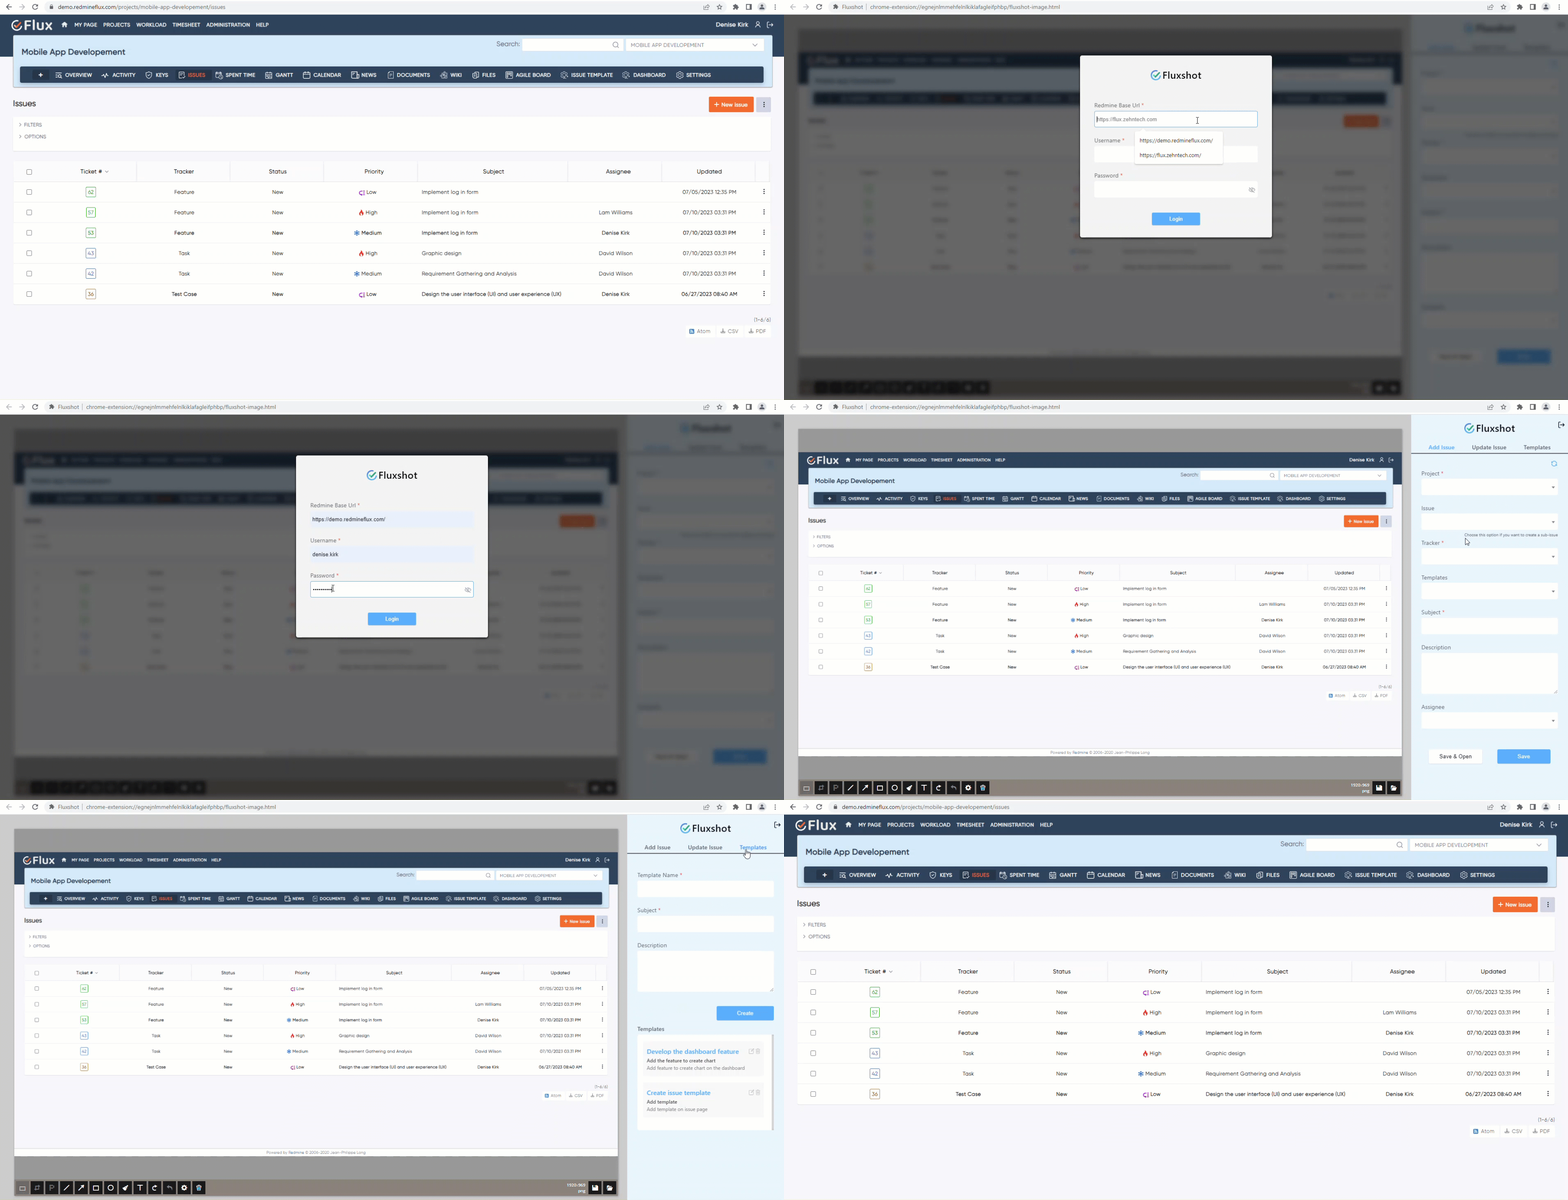
- This will take you to the login page of FluxShot, enter your Redmine credentials to log in.
- Once you’re logged in, you’ll be able to effortlessly capture screenshots of either the entire screen or specific sections.
- You can add, update the issue or task and create the templates on the right side of the captured screenshots.
- Fill in the required fields and save the issue.
- After saving, navigate to the show issue page and create a new issue.
- If the user wants to log out of Fluxshot, they can click on the logout icon located at the top right corner and proceed to log out of Fluxshot.

How To #
How to Capture Screenshots and Add the New Issue on Fluxshot #
- Open a web page that you want to capture or work with.
- Locate the Fluxshot extension icon in the Chrome toolbar (usually located in the top-right corner).
- Click on the Fluxshot icon to open the extension and capture the screenshots.
- This will take you to the login page of Fluxshot, enter your Redmine credentials to log in.
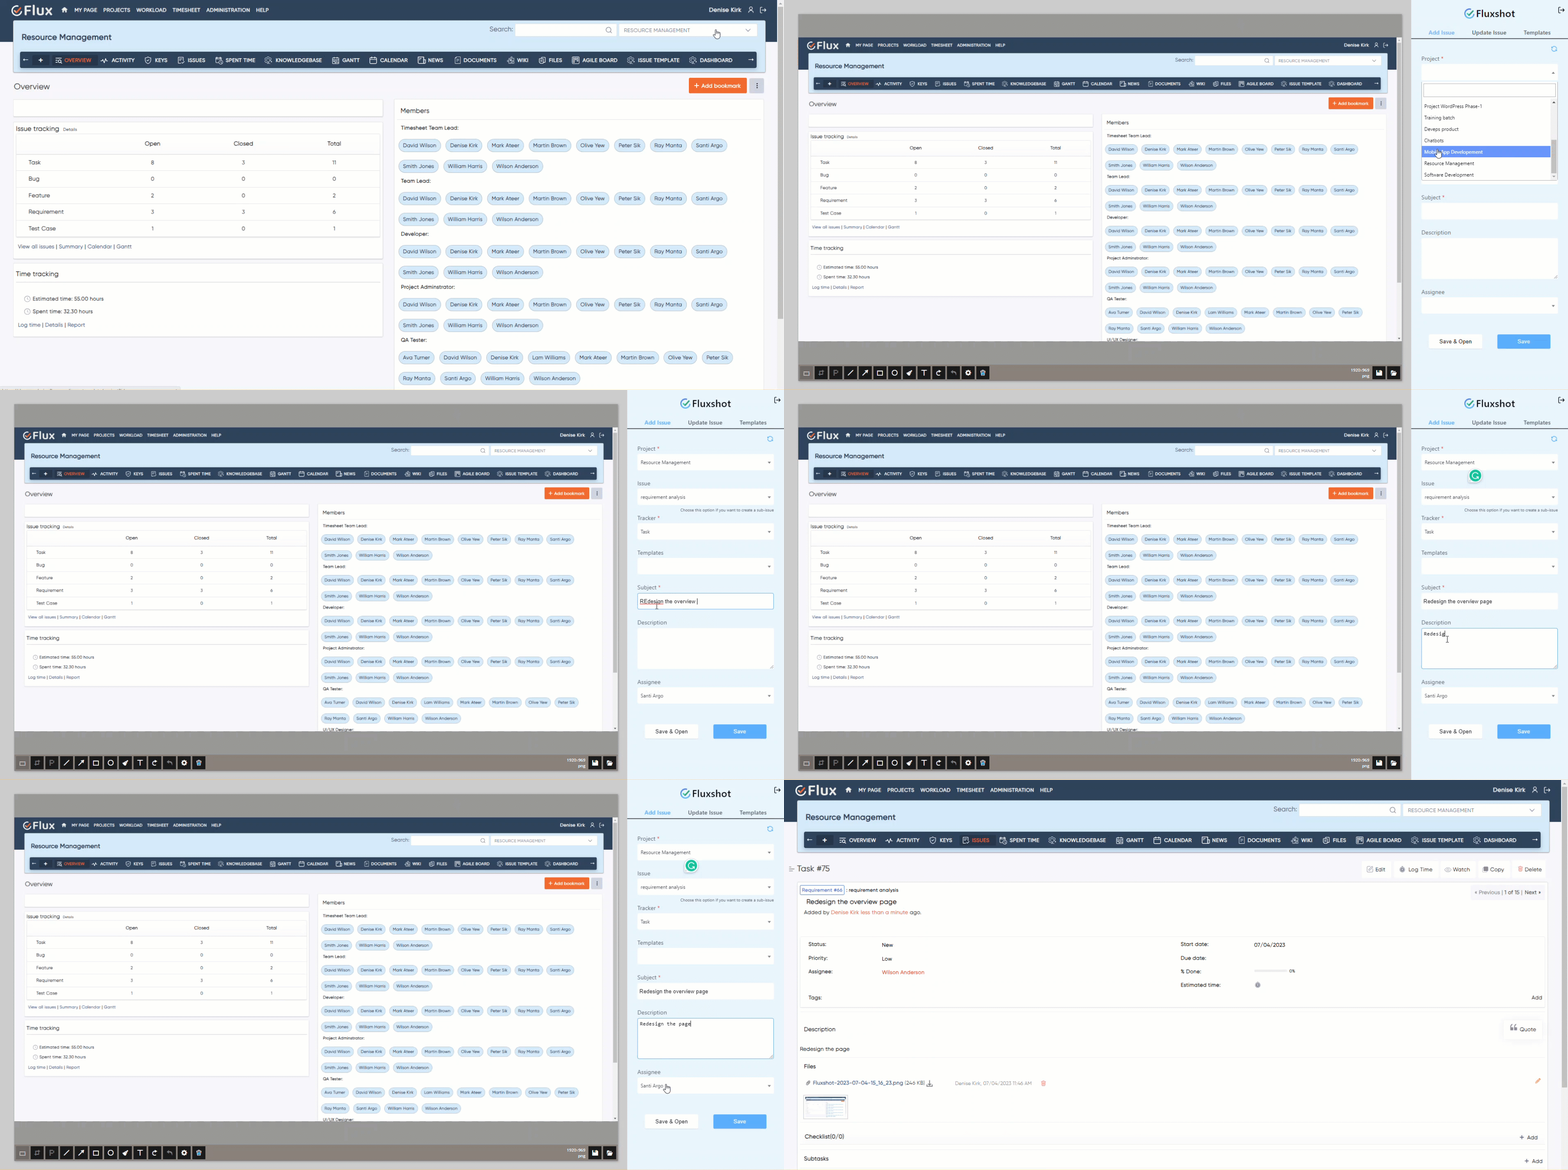
- Once logged in, you can add on the right side of the captured the screenshots.
- After adding the necessary information in the required fields, save the issue.

How to Update the Issue on Fluxshot #
- Open a web page that you want to capture or work with.
- Locate the Fluxshot extension icon in the Chrome toolbar (usually located in the top-right corner).
- Click on the Fluxshot icon to open the extension and capture the screenshots .
- Navigate to screenshot edit page.
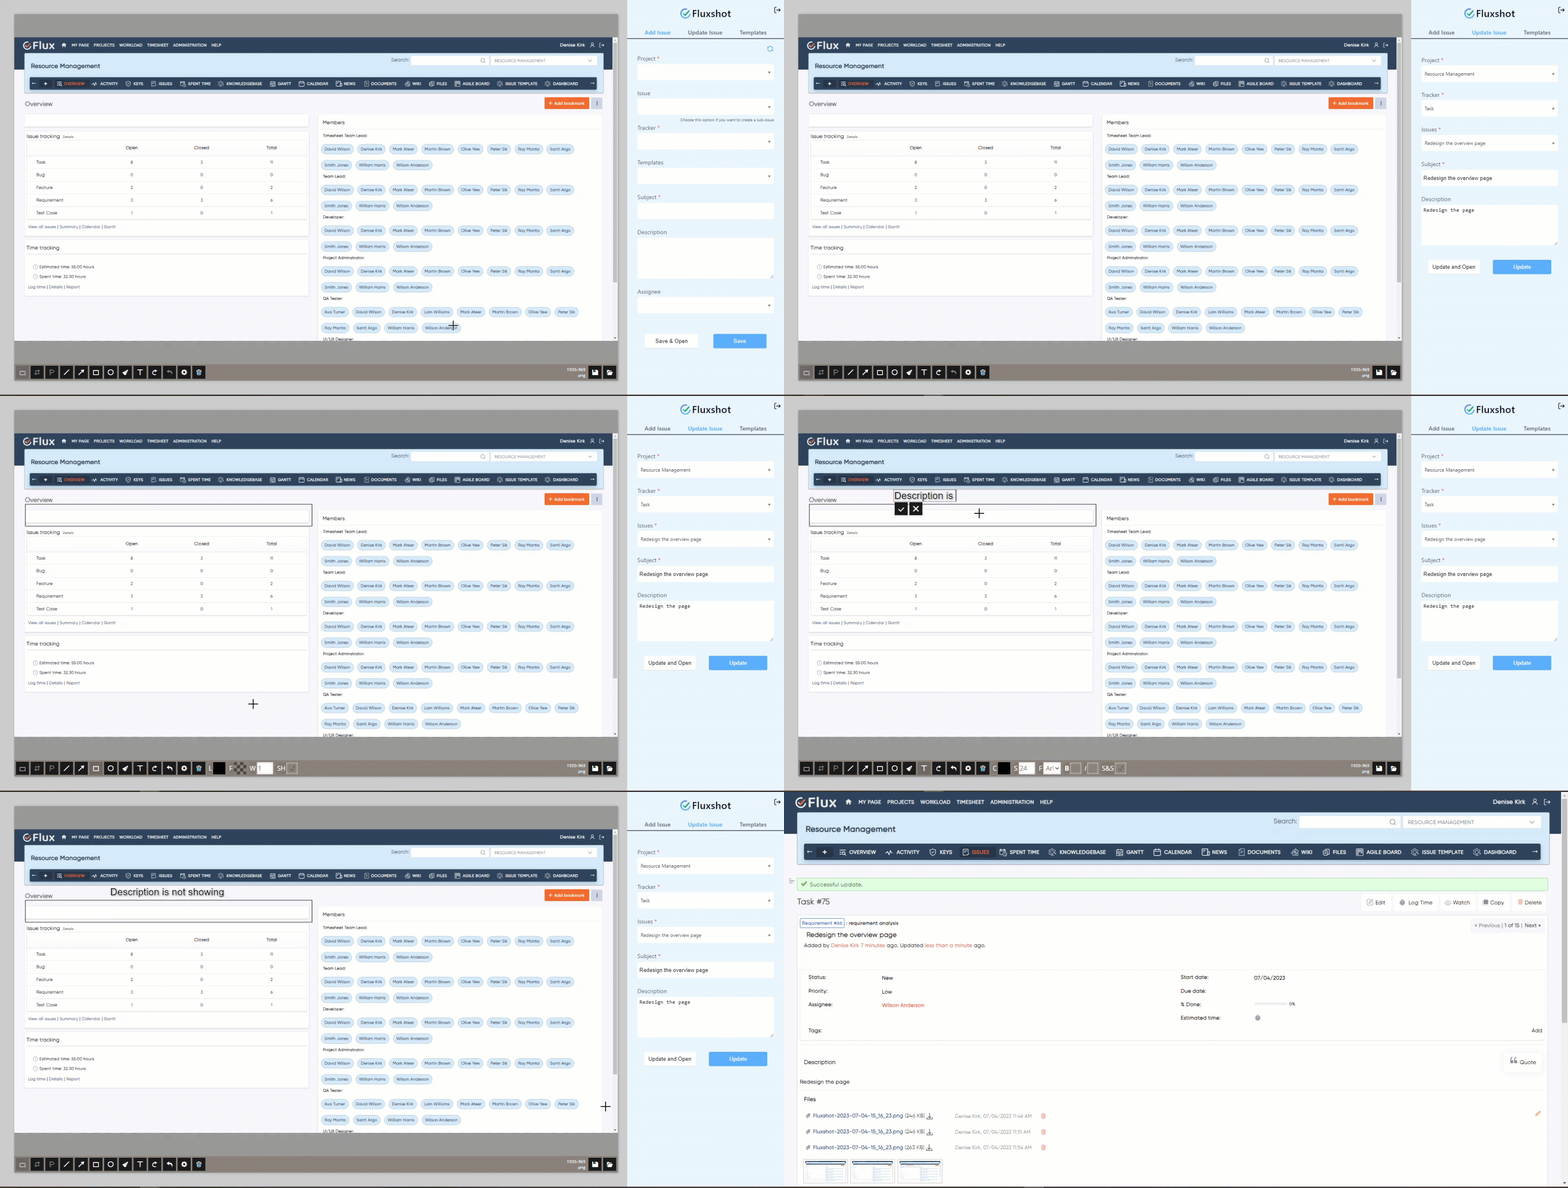
- On the right side, click on the “Update Issue” tab.
- Fill the required fields and update the issue you want.
- Click on the save or update and open button.

How to Create the Templates on Fluxshot #
- Open a web page that you want to capture or work with.
- Locate the Fluxshot extension icon in the Chrome toolbar (usually located in the top-right corner).
- Click on the Fluxshot icon to open the extension and capture the screenshots .
- Navigate to screenshot edit page.
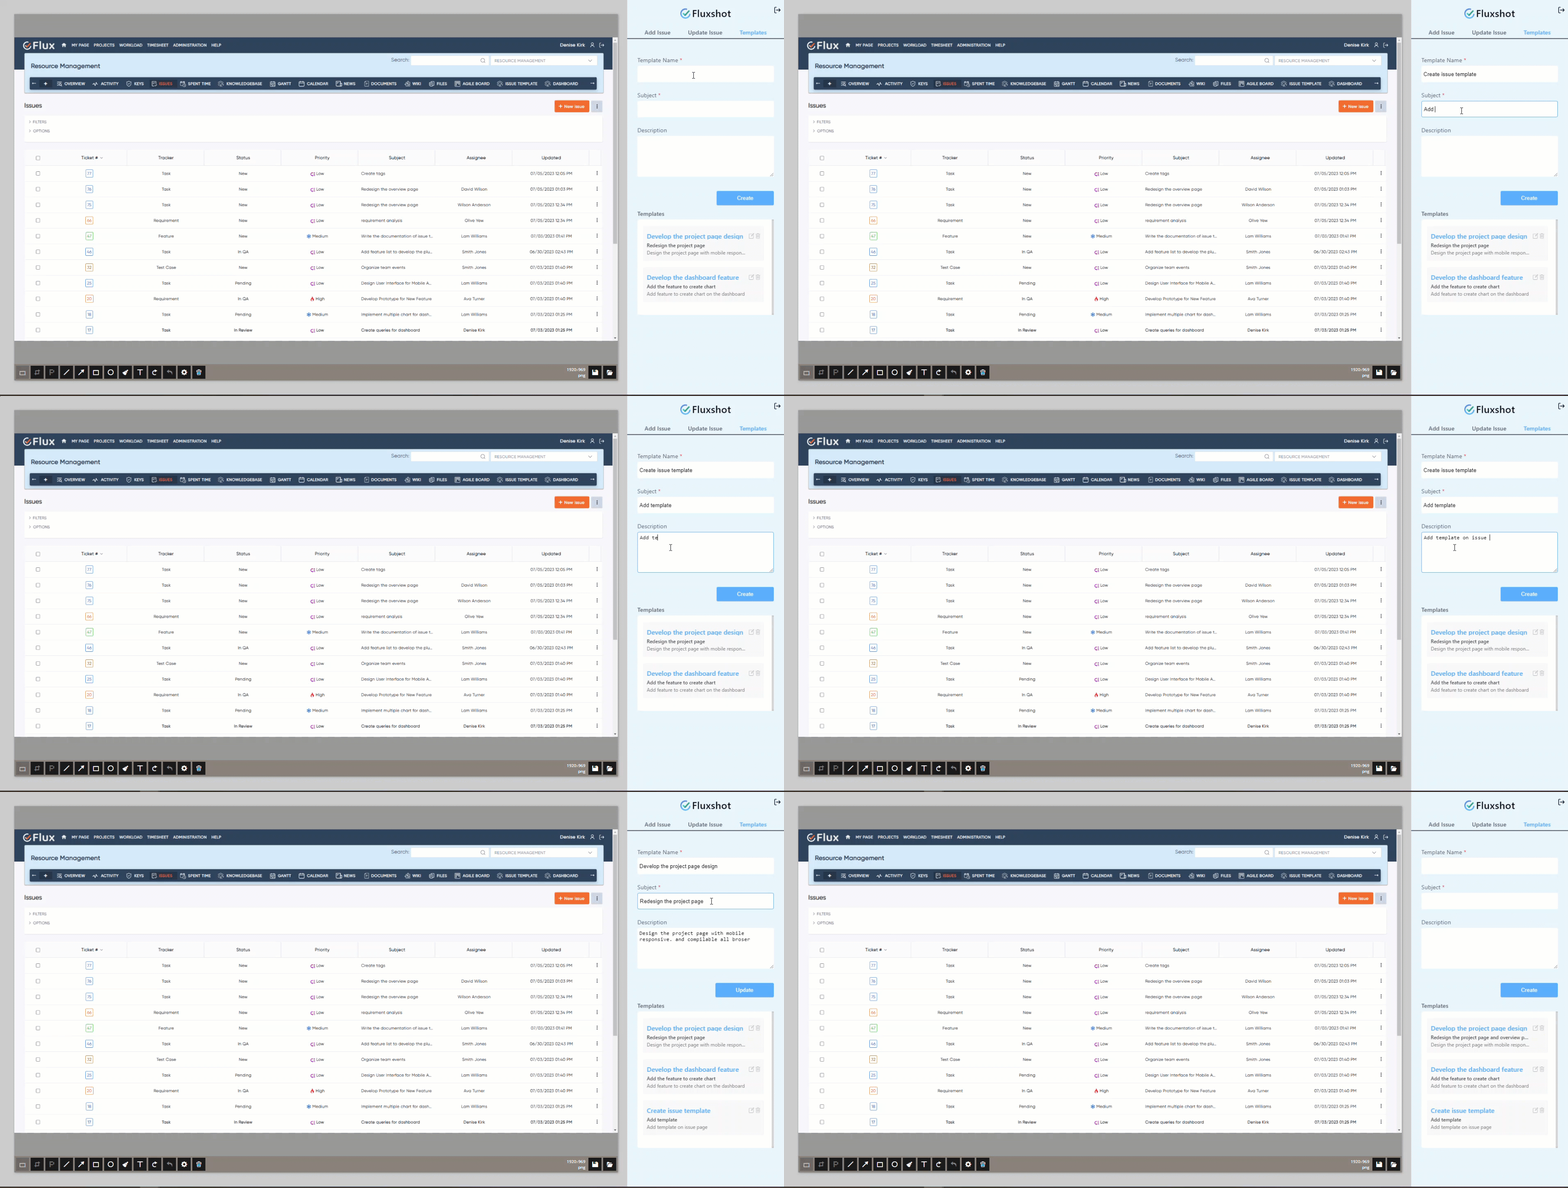
- On right side , click on the “Templates” tab.
- Fill the required fields and create the templates.
- Click on the create button and the created templates will be display at bottom.
- User can update the templates by clicking on the edit icon.
- Template will auto-fill and update accordingly.
- Additionally, users can delete the templates by clicking on the trash icon (delete icon) or by selecting the template.

How to Edit the screenshots on Fluxshot #
- Open a web page that you want to capture or work with.
- Locate the Fluxshot extension icon in the Chrome toolbar (usually located in the top-right corner).
- Click on the Fluxshot icon to open the extension and capture the screenshots .
- Navigate to screenshot edit page.
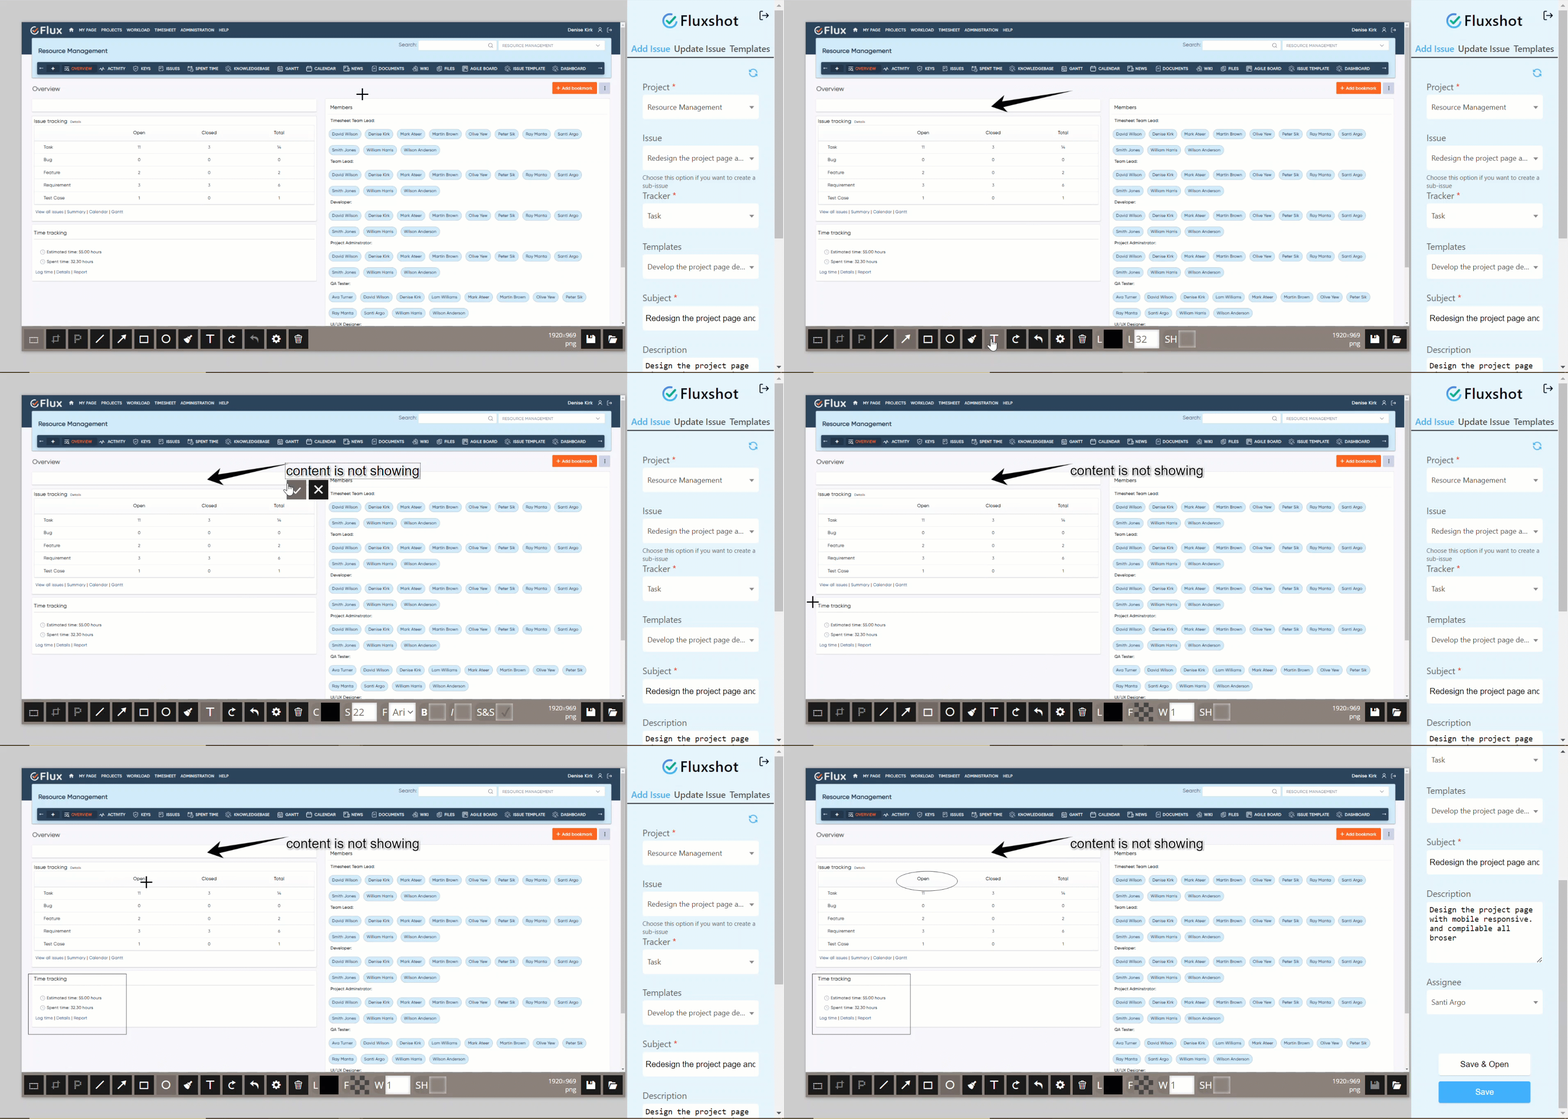
- Select the toolbar tools like text, shapes (rectangles, circles, and arrows), drawing tools (pencils, brushes), and highlighting underlining tools, and more. To add text annotations, select the text tool, select the desired font, size, and color, and then click on the image to create a text box. Enter the desired text and place it in the desired location.
- Save the image or screenshot.

Troubleshooting #
- Ensure the extension is enabled: Check if Fluxshot is enabled in your Chrome browser. Click on the puzzle piece icon in the Chrome toolbar, then locate Fluxshot in the list of extensions. Ensure the toggle switch is set to “Enabled”.
- Clear browser cache: Sometimes, browser cache can cause conflicts with extensions. Clear your browser cache by going to Chrome settings, selecting ” Privacy and security”, and clicking on “Clear browsing data”. Make sure to select the appropriate options and clear the cache.
- Update Fluxshot: Ensure you have the latest version of Fluxshot installed. Open the Chrome Web Store, search for Fluxshot, and check if there is an update available. If an update is available, click on the “Update” button.
- Restart Chrome: Close and reopen your Chrome browser. This can help refresh the extension and resolve any temporary issues.
- Disable conflicting extensions: Some other extensions may conflict with Fluxshot. Temporarily disable other extensions to see if Fluxshot works properly. If the issue is resolved after disabling a specific extension, consider removing or updating that extension.
- Reinstall Fluxshot: If the issue persists, try uninstalling and reinstalling Fluxshot. To uninstall, right-click on the Fluxshot icon in the Chrome toolbar and select “Remove from Chrome” Then follow the installation steps mentioned in the documentation to reinstall Fluxshot.
Frequently Asked Questions (FAQs) #
Q: What is the Fluxshot?
A: Fluxshot is a Chrome extension designed to be integrated with Redmine to take screenshots and create issues or tasks.
Q: Can I edit or modify a captured screenshot before saving it?
A: Yes, Fluxshot provides a comprehensive set of annotation tools to edit and annotate captured screenshots.
Q: Can I create or add new issues by using fluxshot?
A: Yes, Fluxshot allows you to create or add new issues, tasks, or action items based on the captured screenshots. After capturing and saving a screenshot, Fluxshot provides options to create new tasks or issues related to the captured screenshots.
Q: Can I Update the issue on Fluxshot?
A: Yes, Fluxshot allows users can update the issue in Fluxshot by navigating to the Fluxshot edit page, opening the “Update Issues” tab, making the necessary updates, and clicking on the “Update” or “Update and Open” button.
Uninstallation of Plugin #
Remove the Fluxshot extension
- Open the Chrome browser on your computer.
- Click on the puzzle piece icon in the Chrome toolbar to access the Extensions menu.
- In the Extensions menu, locate the Fluxshot extension.
- On right side click on more options .
- In the context menu that appears, select “Remove from Chrome”.
- A confirmation dialog may appear asking you to confirm the removal. Click “Remove” to proceed.
Uninstall the Fluxshot plugin
To uninstall the Redmineflux Fluxshot, follow these steps
- Go to the Fluxshot directory in Redmine.
- Delete the entire Fluxshot directory from Redmine/plugins directory. This step removes the plugin files from your Redmine installation.
- If the plugin required a migration, run the following command to downgrade your database (make a db backup before):
bundle exec rake redmine:plugins:migrate NAME=plugin_name VERSION=0 RAILS_ENV=production
- Restart the Redmine server to see the changes.
- This will uninstall the Redmineflux Fluxshot from Redmine.
Conclusion #
Redmineflux Fluxshot is a versatile Chrome extension that simplifies the process of capturing screenshots, annotating them, and creating tasks or issues based on the captured images. It provides a user-friendly interface with powerful annotation tools, allowing users to add text, shapes, arrows, and highlights to screenshots for enhanced communication and clarity.
Daisy Redmine Theme
Scarlet Redmine Theme
All Plugins Combo
Project Management Combo
Redmine Essential Plugin Combo
Plugins
Redmine Implementation & Support Services
Cloud Redmine
Redmine Themes

Plugins
Plugin Combo
Cloud Redmine
Themes

About Us
Blog
Testimonials
Knowledgebase
Change Log
Use Cases


