Introduction #
The Redmineflux Workload plugin is a powerful tool that helps you manage your team’s resources and capacity. It allows you to track estimated time on tasks, create resource schedules and visualize workload. The plugin visualizes workload by showing you how much time each resource has available. This helps you to identify potential bottlenecks and ensure that your team is not overloaded.
Version Compatibility #
Redmine Versions
- 4.0.x, 4.1.x, 4.2.x
- 5.0.x, 5.1.x
- 6.0.x(coming soon)
Installation #
To install the Redmineflux Workload plugin follow these steps
- Make sure you have a working installation of Redmine.
- Extract the downloaded Workload plugin archive to the “Plugins” directory of your Redmine installation.
- Run the following command from the Redmine root directory to install the plugin dependencies:
- bundle install
- Run migrate command for database migration:
->In Production
RAILS_ENV=Production bundle exec rails redmine:plugins:migrate
->In Development
RAILS_ENV=Development bundle exec rails redmine:plugins:migrate
- Restart the Redmine server to load the plugin
rails s
How to #
How to View Workload Dashboard #
- Login to Redmine using your credentials.
- Navigate to top menu.
- Click on the “Workload” tab to access the Workload dashboard.

How to Add Task to the Planning #
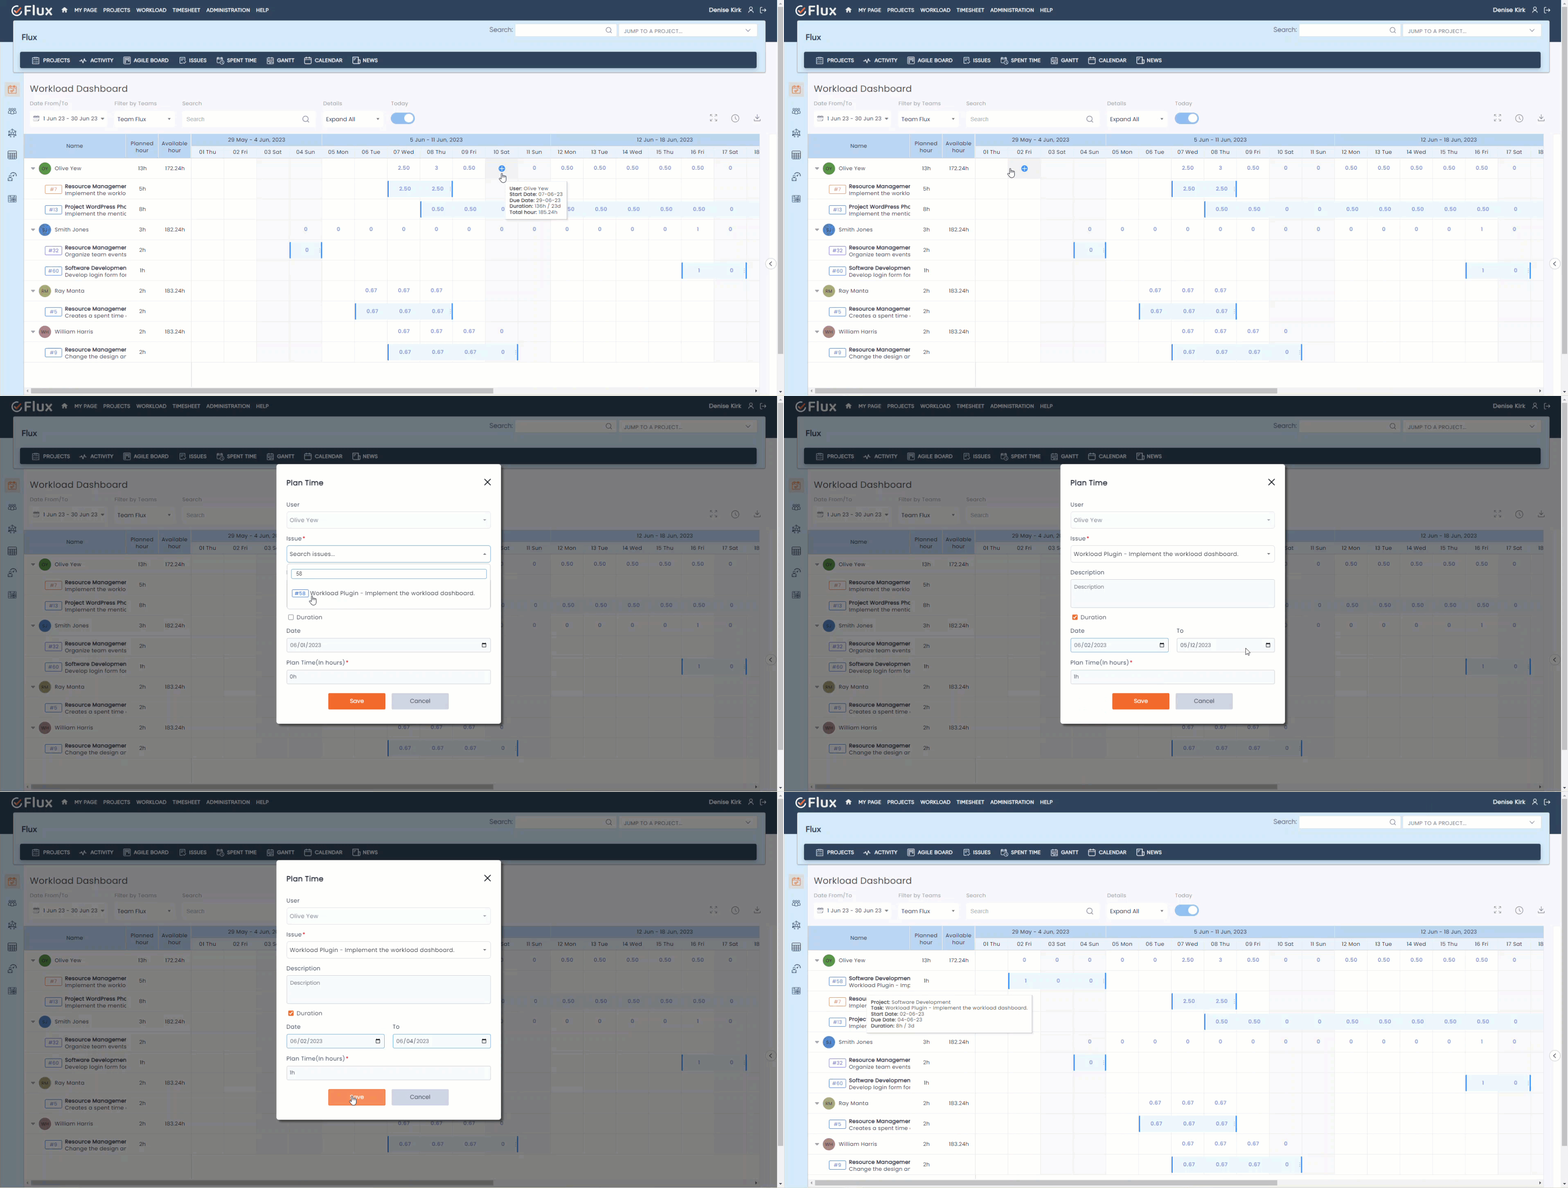
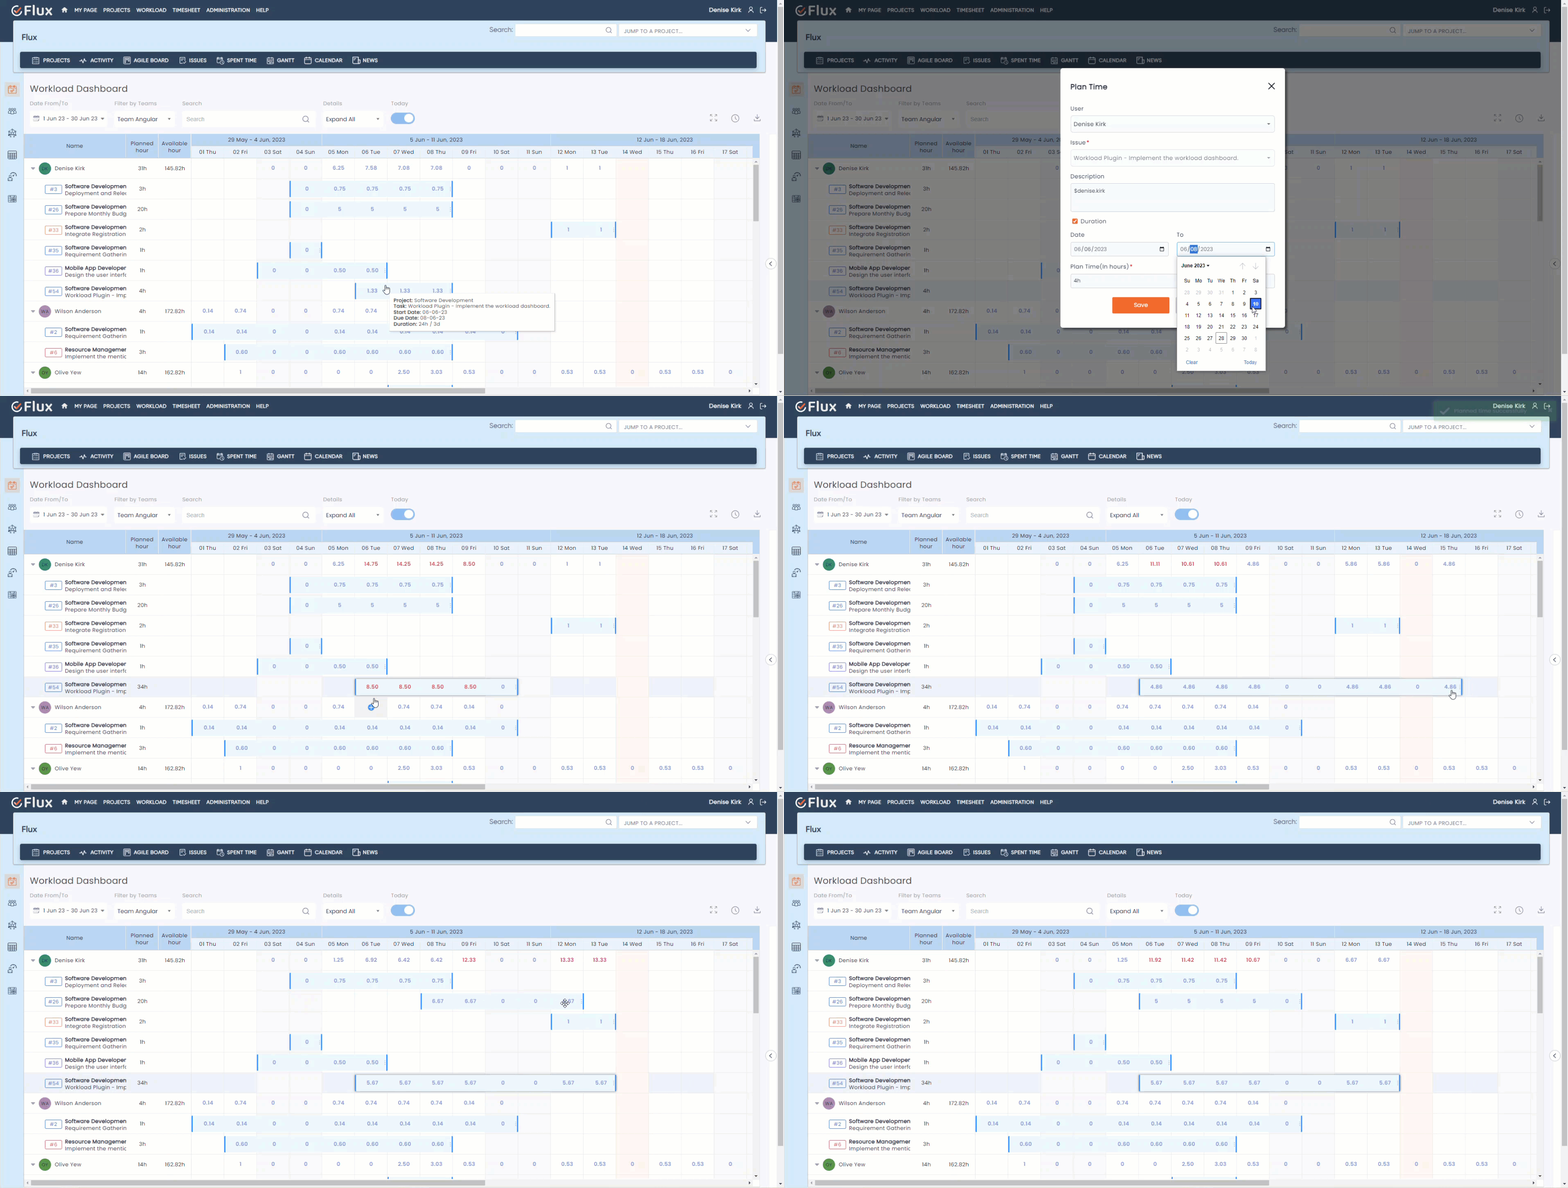
- To add tasks to the workload planning, you can either click on the clock icon located in the right corner of the workload dashboard or hover over the user row cells.
- Select the task by searching for it using either the task ID or subject.
- Once you have entered all the required information, click on the “Save” button to add the task to the dashboard.
- If you decide to discard any changes or cancel the task addition, simply click on the “Cancel” button.

How to Allocate Task to Resources #
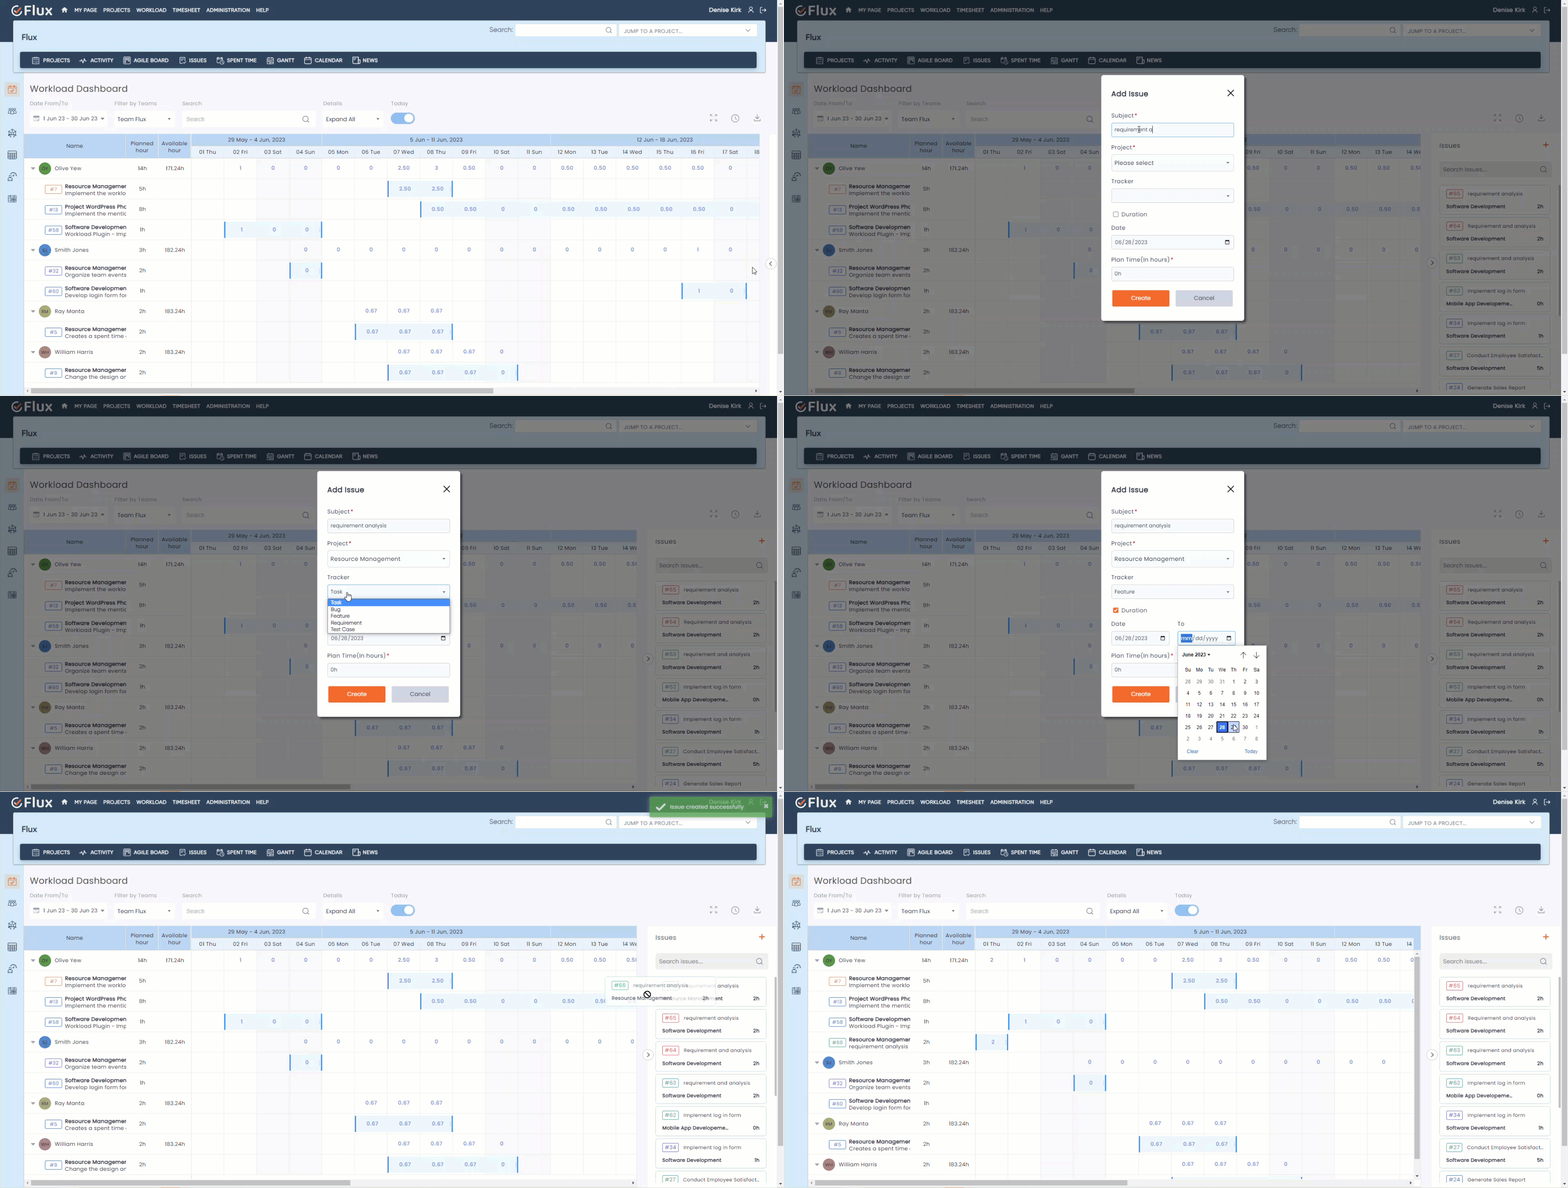
- To add a new unassigned task to the panel, simply click on the plus icon.
- To search for a specific task, you can use either the task ID or the task subject as search criteria.
- To allocate the task to resources, drag the task from the issue side panel.
- Then, drop the task in the timeline area of the user to assign the task to that user.

How to Expand and Collapse Workload #
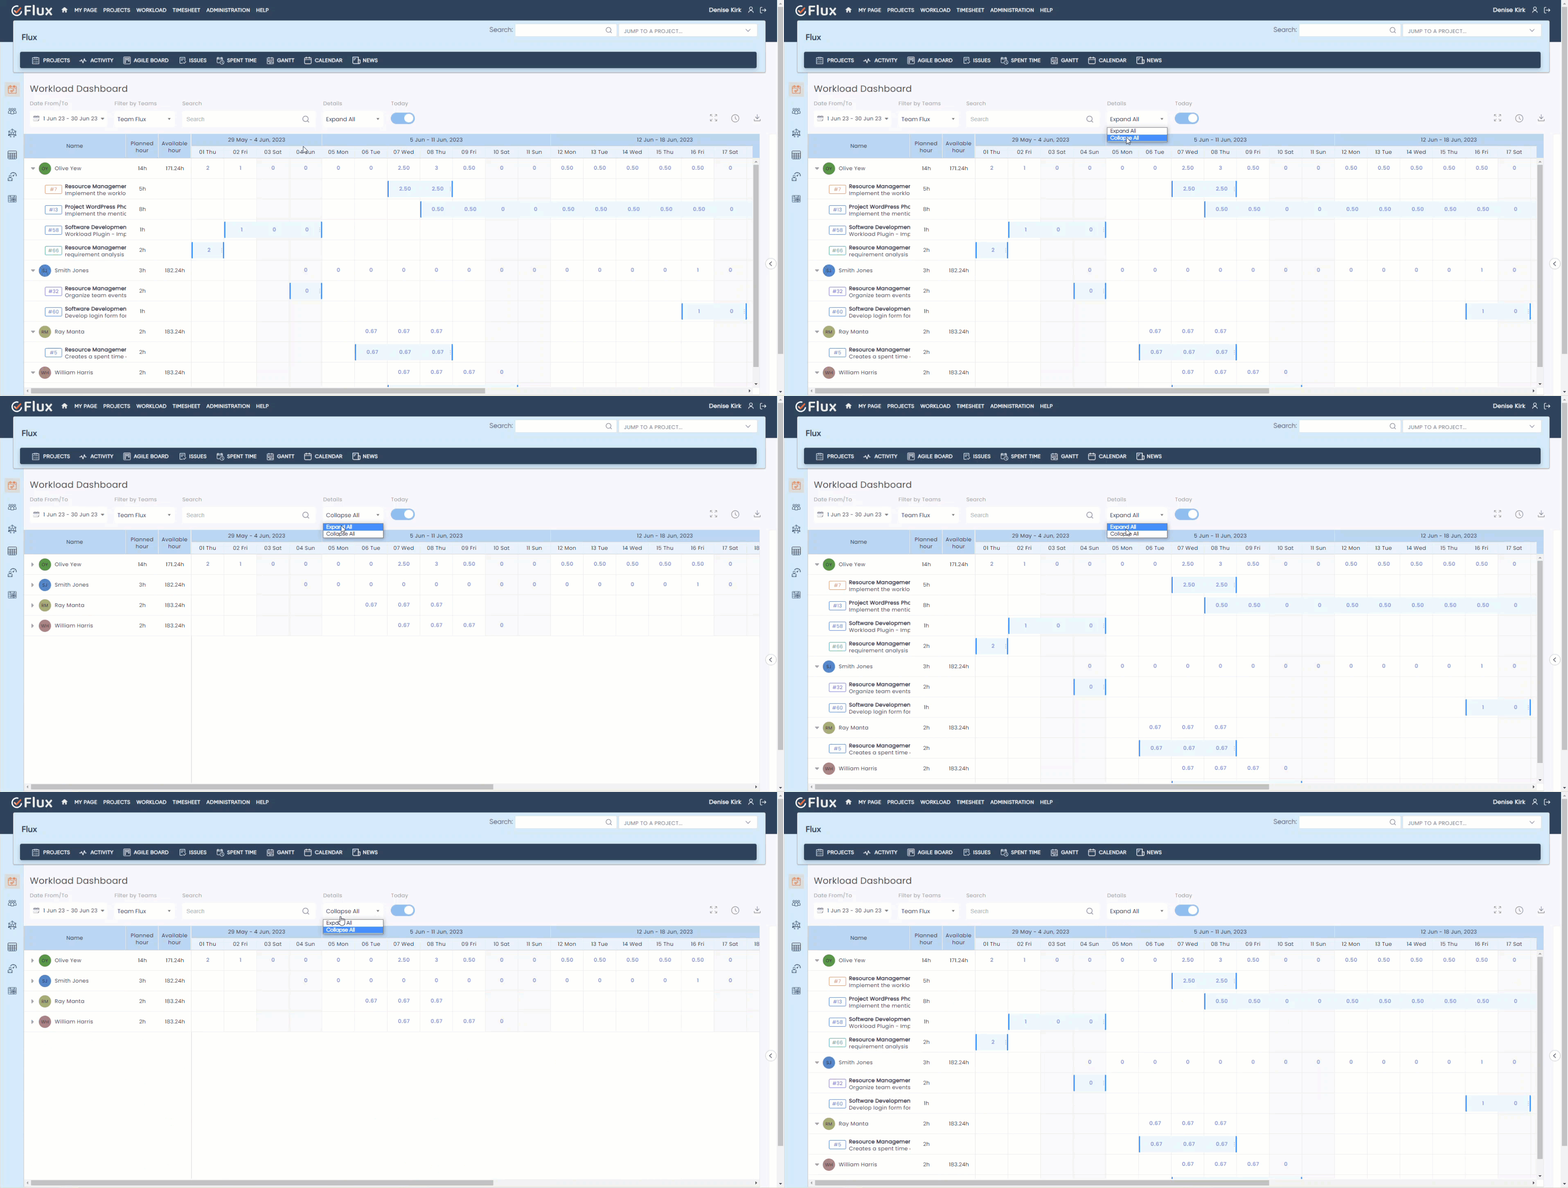
- To Collapse Workload, simply click on the “Collapse all” option.
- To Expand Workload, simply click on the “Expand all” option.

How to Search for Tasks or Users in the Workload #
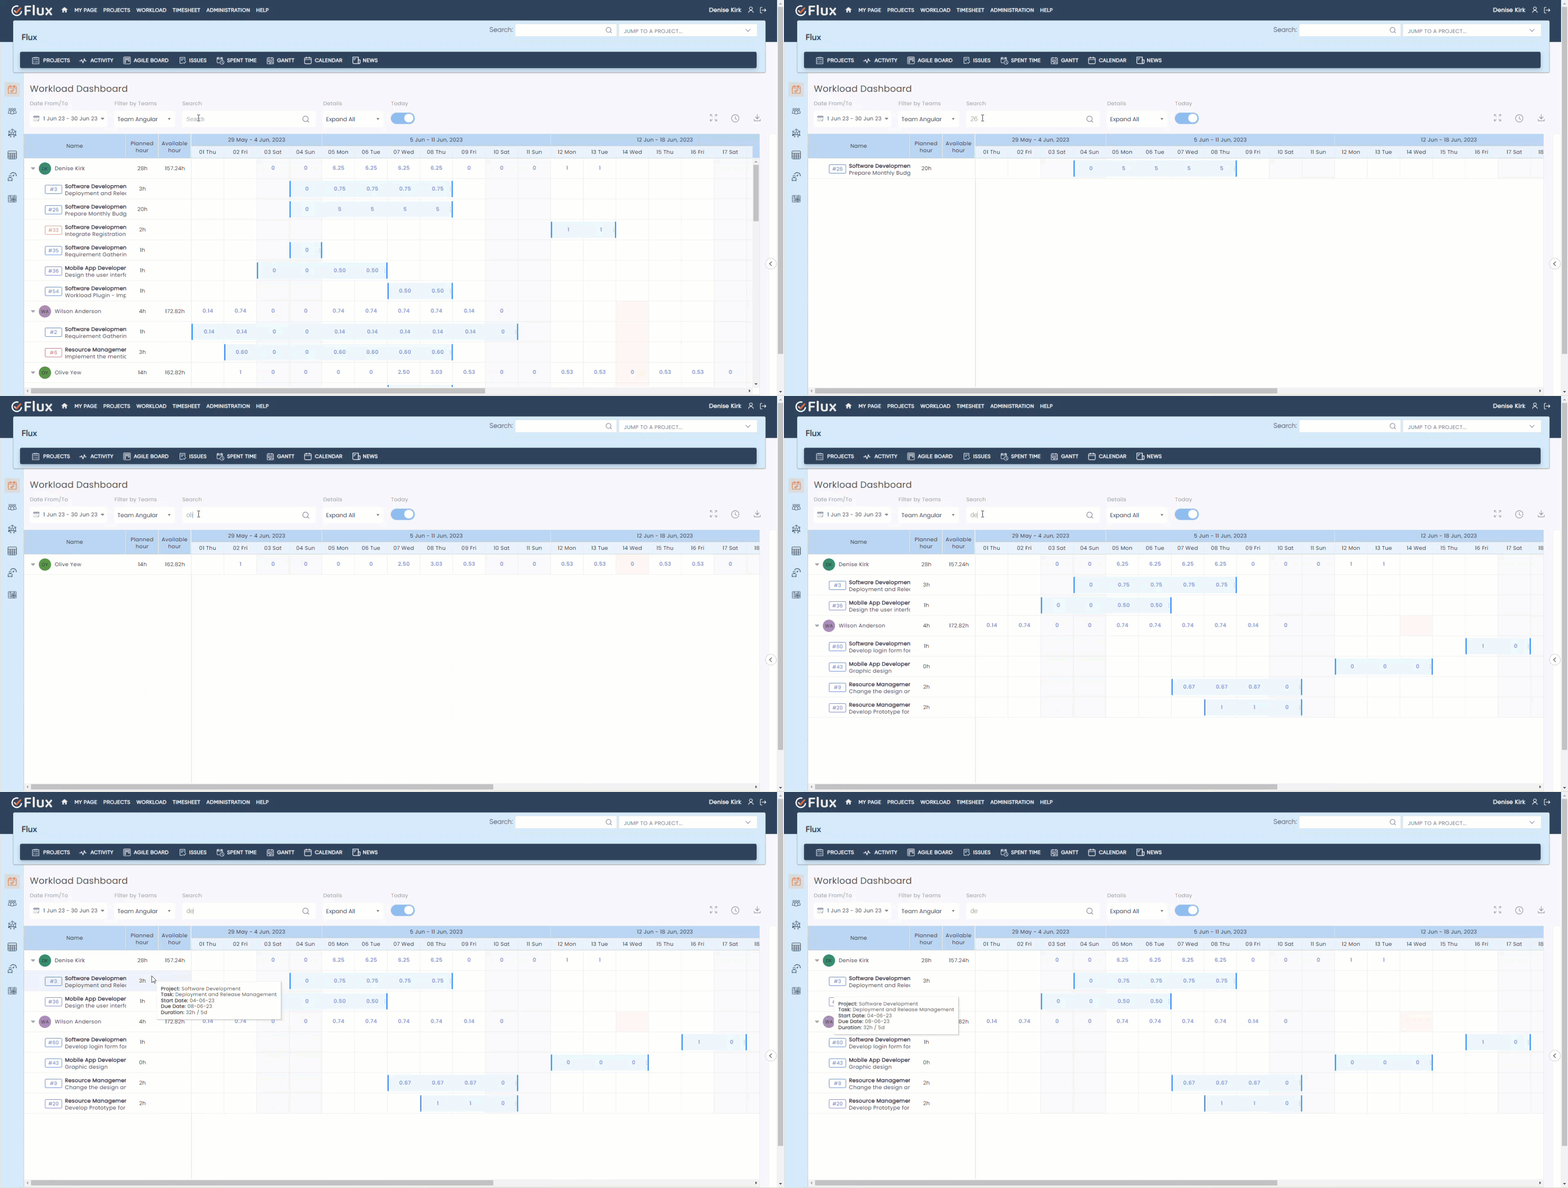
The Redmineflux Workload feature allows users to conveniently search for tasks within the workload dashboard using task ID or subject. Additionally, users can search for specific users by utilizing user ID or name.

How to View the Workload of Different Teams in Redmineflux Workload #
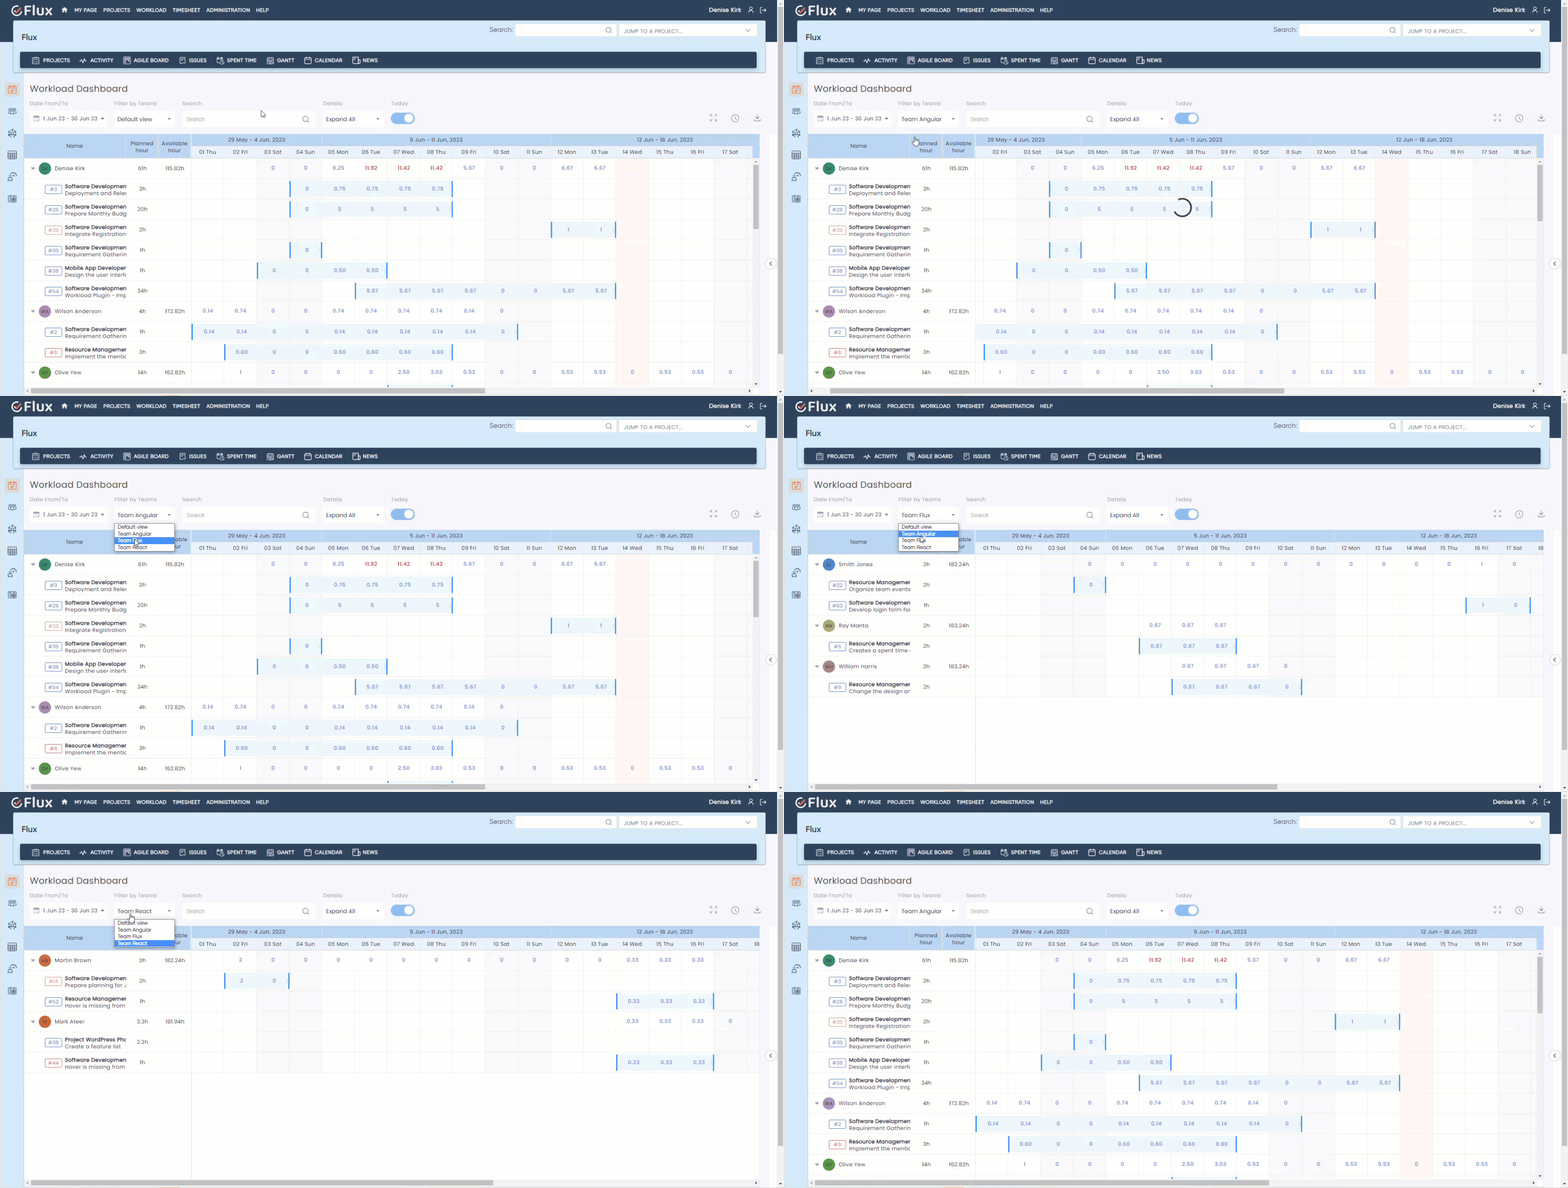
To view the workload of different teams in Redmineflux Workload, follow these steps
- Locate and select the team dropdown menu.
- From the dropdown menu, choose the desired team you wish to view.
- The workload will automatically update to display the selected team’s workload.
- Make sure you have administrator access to see teams dropdown menu.
- By selecting different teams from the dropdown menu, you can easily switch between viewing the workload of various teams within your project or organization.

How to View the Workload for a Custom Date Range in Redmineflux Workload #
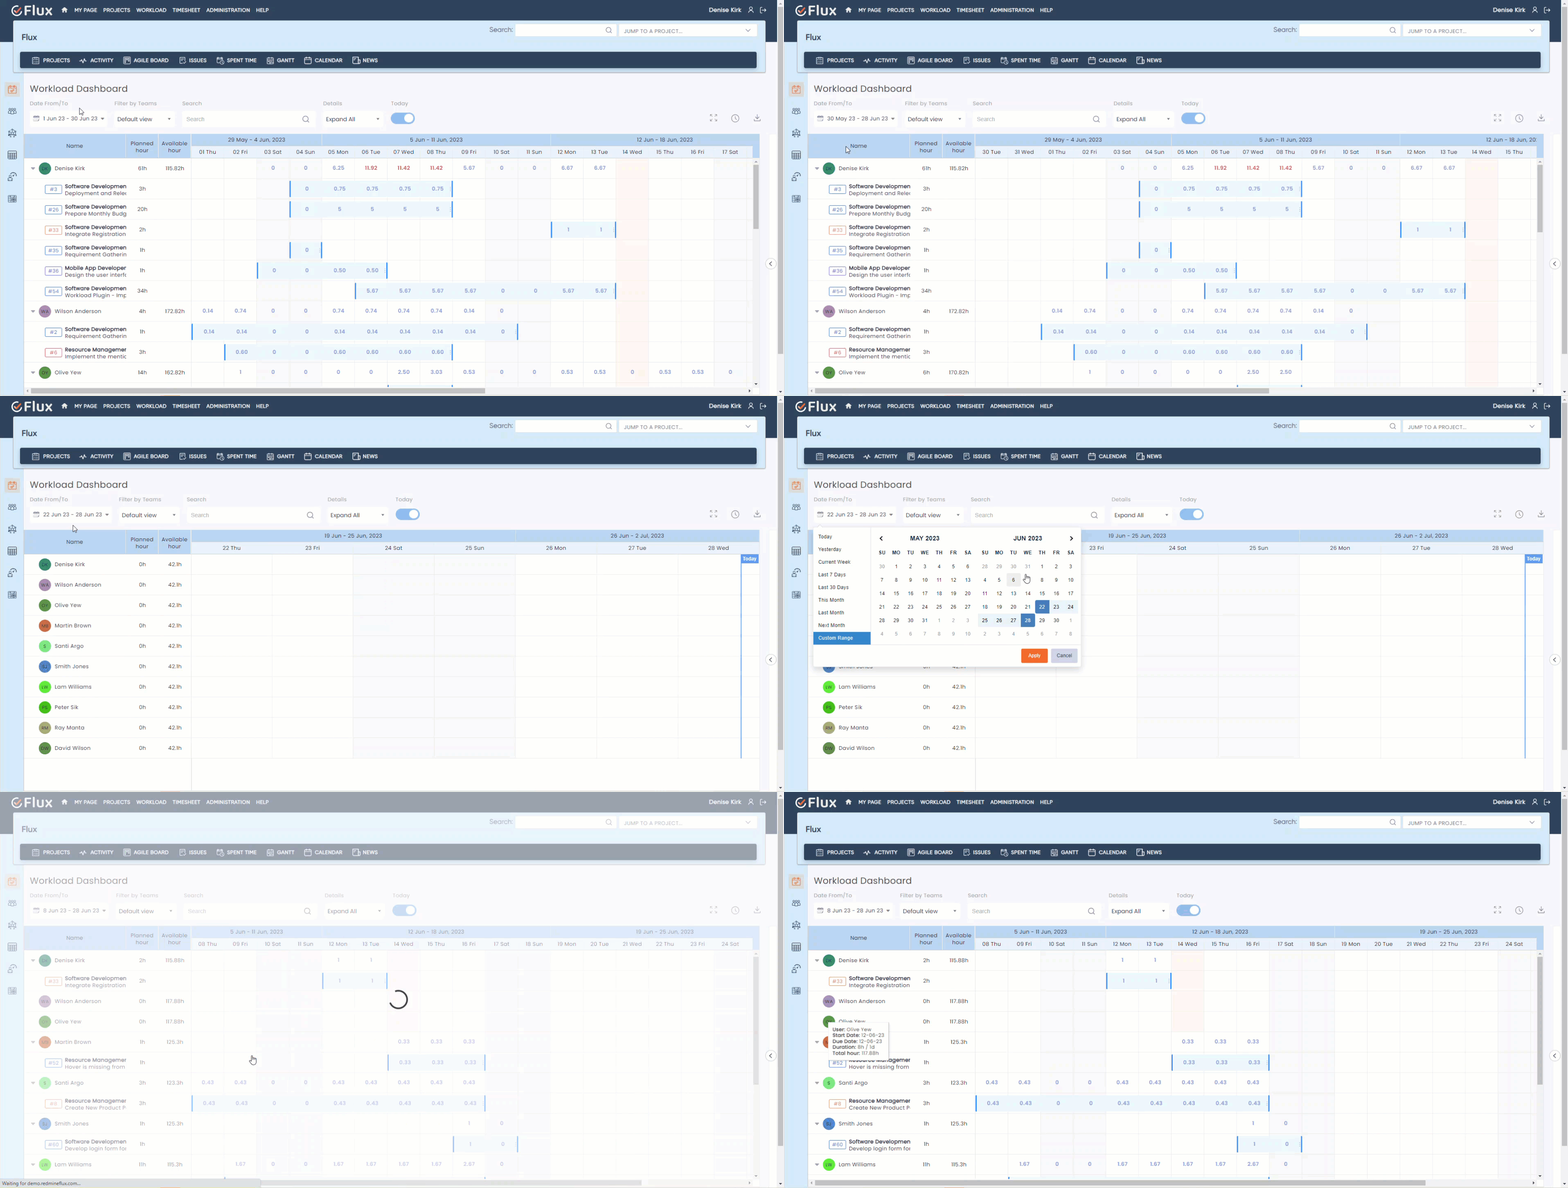
To view the workload for a custom date range in Redmineflux Workload, follow these steps
- Locate the date range selector or date picker option.
- Click on the date range selector to open the calendar.
- Choose the start date and end date that define your desired custom date range.
- Once you have selected the appropriate dates, the workload will automatically update to display the tasks and resource allocation within the specified custom date range.
- By selecting a custom date range, you can easily analyze and monitor the workload of your team or project within a specific timeframe, allowing for better planning and resource management.

How to Check Resource Availability from Workload Dashboard #
To check resource availability from the workload dashboard in Redmineflux Workload, follow these steps
- Access the workload dashboard in Redmineflux Workload.
- Identify the resource or user for whom you want to check availability.
- Locate the corresponding resource row or user row in the workload view.
- Review the availability indicators or visual cues provided in the workload dashboard. These indicators may include color-coded red color of text shows user is overallocation of tasks, green color shows actual allocations of task and light blue color indicate balanced allocation.
- The availability indicators will reflect the availability status of the resource, indicating if they are overallocated, underutilized, or properly balanced.
- Based on the availability indicators, you can assess the resource’s workload and availability within the specified period.
By checking resource availability directly from the workload dashboard, you can easily monitor and manage resource allocation, ensuring optimal utilization and workload distribution across your team or project.

How to Add Workload Scheme in Redmineflux Workload #
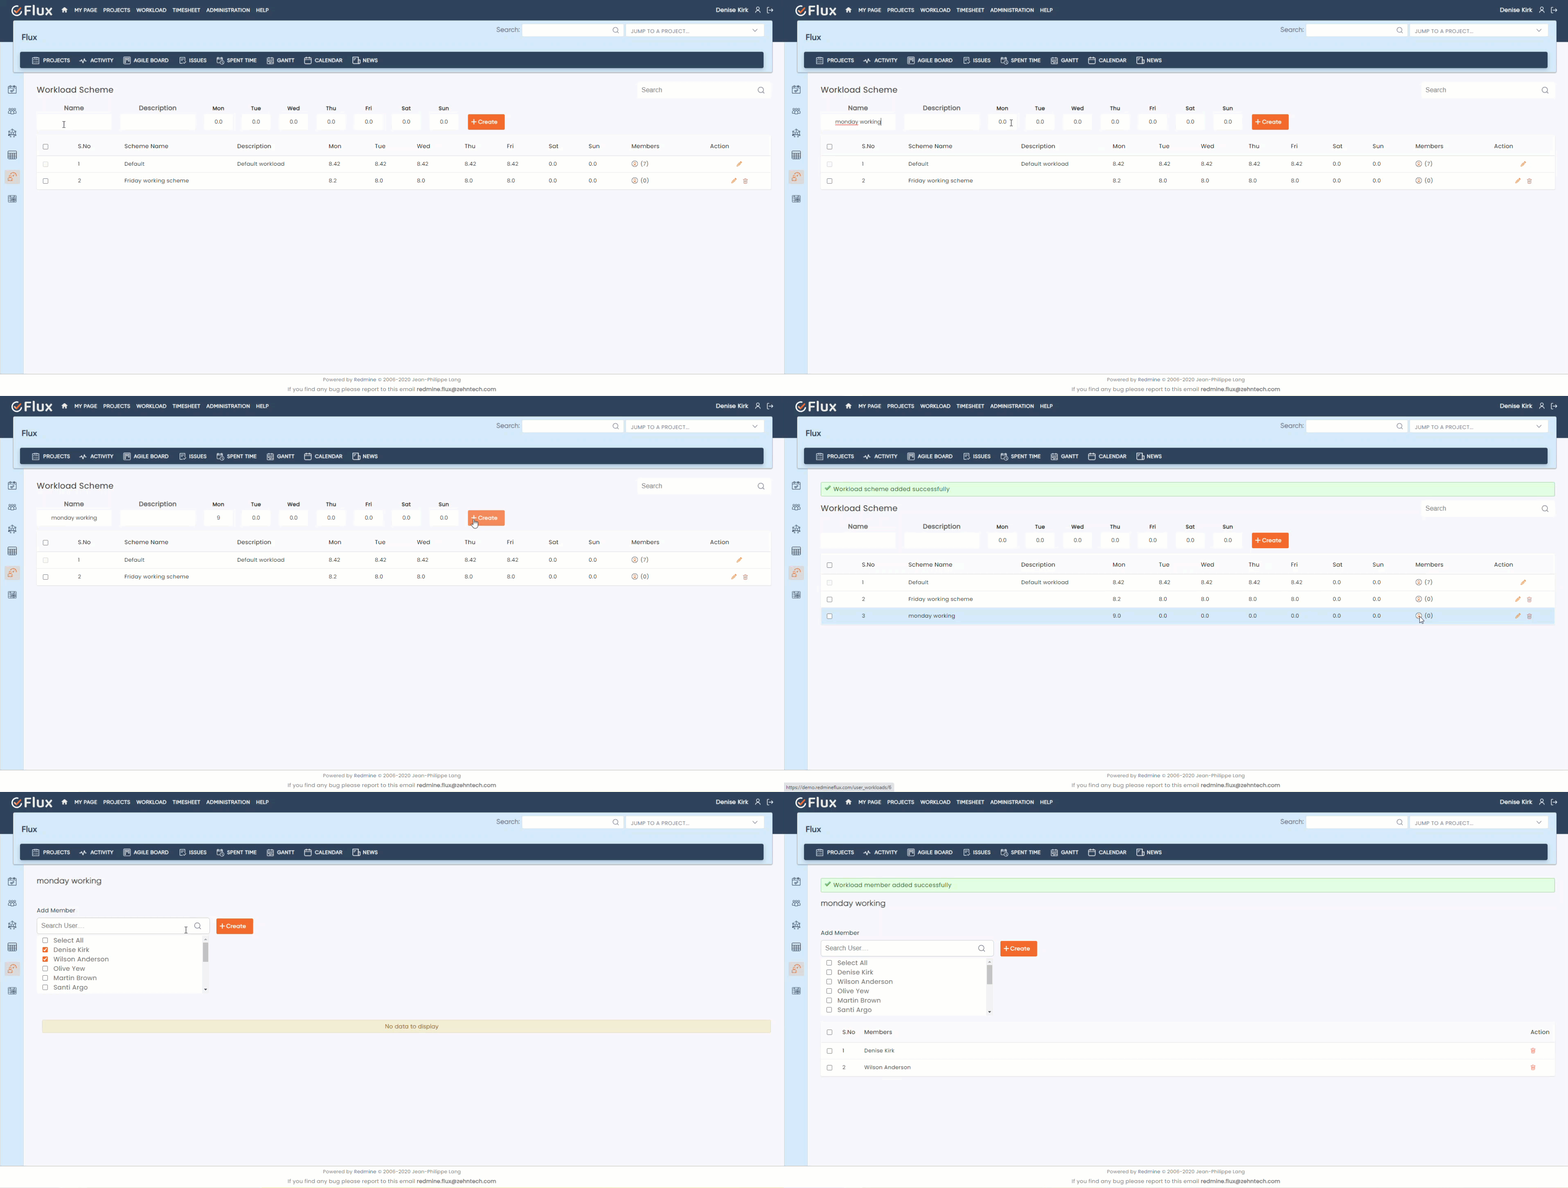
To add a workload scheme in Redmineflux Workload, follow these steps
- Access the administration settings of Redmineflux Workload.
- Navigate to the workload scheme section.
- Look for the option to add a new workload scheme.
- Click on the “Create” button to start creating a new workload scheme.
- Provide a name for the workload scheme to easily identify it and add per day working hours to the scheme.
- Save the newly created workload scheme.
- To add members to the Workload Scheme click on the “Members” icon.
- Select multiple users to include in the scheme and click the “Create” button.
- To remove members from the scheme click on the “Trash” icon.
- To make changes to the workload scheme, click on the “Edit” icon.
- To delete the workload scheme, click on the “Delete” icon.
By adding a workload scheme, you can customize and tailor the workload management process to match your project’s specific requirements. This allows for efficient allocation of tasks, resource planning, and workload distribution within Redmineflux Workload.

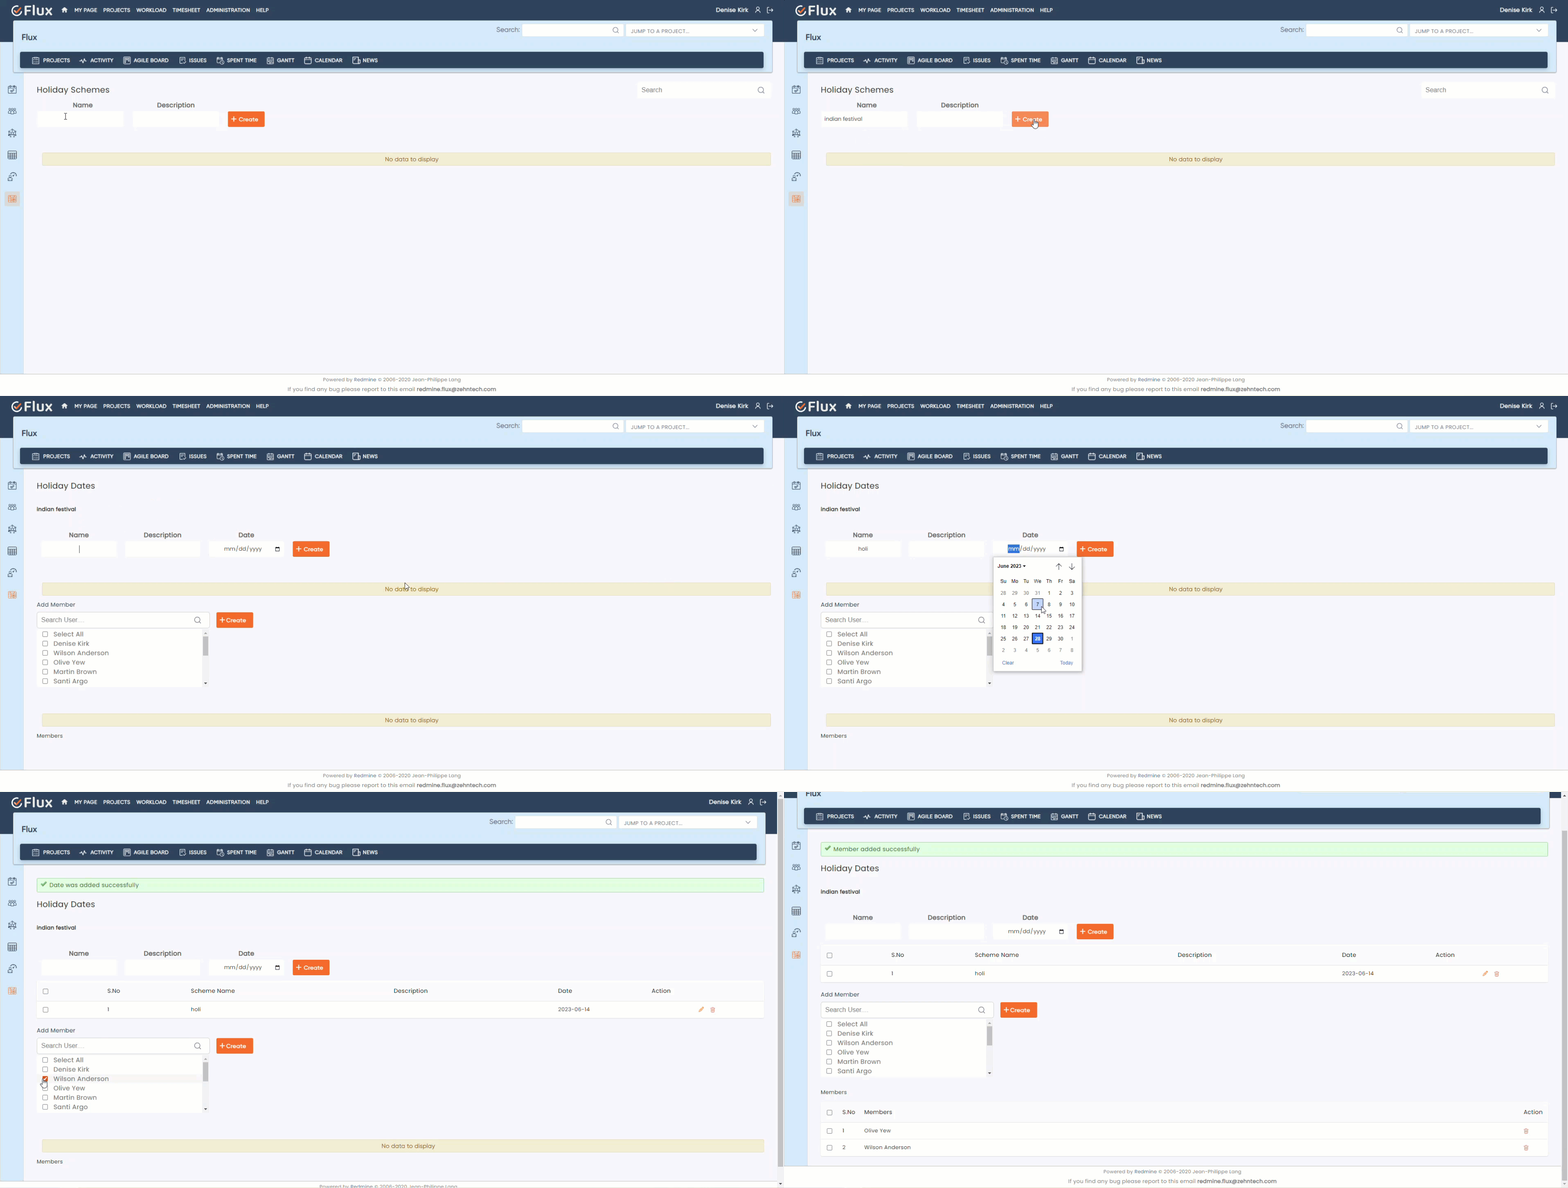
How to Add Holiday Scheme in Redmineflux Workload #
To add a workload scheme in Redmineflux Workload, follow these steps
- Access the administration settings of Redmineflux Workload.
- Navigate to the holiday Scheme section.
- Look for the option to add a new holiday scheme.
- Click on the “Create” button to start creating a new holiday scheme.
- Provide a name for the holiday scheme to easily identify it and add a description if needed.
- Save the newly created holiday scheme.
- Provide a holiday date and name and click on the “Create” button.
- To add members to the holiday scheme click on the “Members” icon.
- Select multiple users to include in the scheme and click the “Create” button.
- To remove members from the scheme click on the “Trash” icon.
- To make changes to the holiday scheme, click on the “Edit” icon.
- To delete the holiday scheme, click on the “Delete” icon.

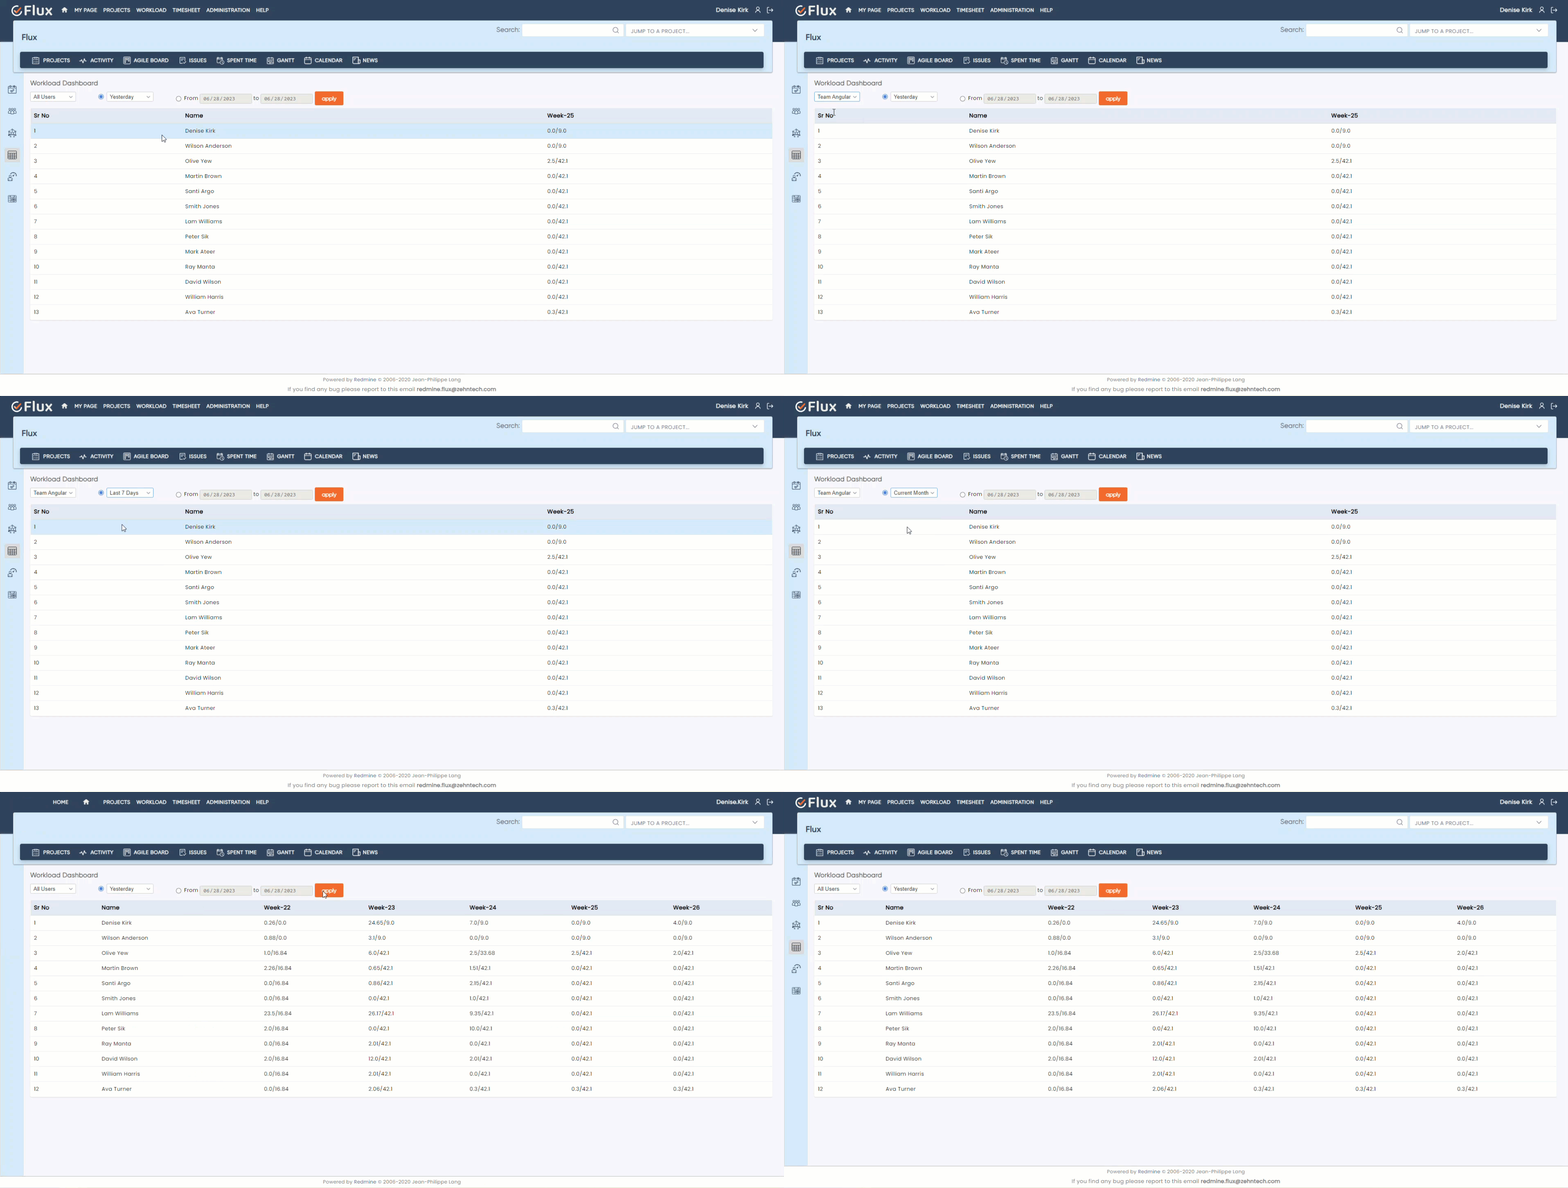
How to View the Planned vs Actual Dashboard in Redmineflux Workload #
To view Planned vs Actual Dashboard in Redmineflux Workload, follow these steps
- Access the administration settings of Redmineflux Workload.
- Navigate to dashboard page.
- Select the desired team from the available options.
- Choose the desired date range using the provided date picker
- Once you have selected the team and date range, click on the “Apply” button.
- The workload view will update to display the workload data for the selected team and date range.
By selecting a team and specifying a date range, you can focus on the workload of a particular team within a specific timeframe, allowing for better analysis and resource management in Redmineflux Workload.

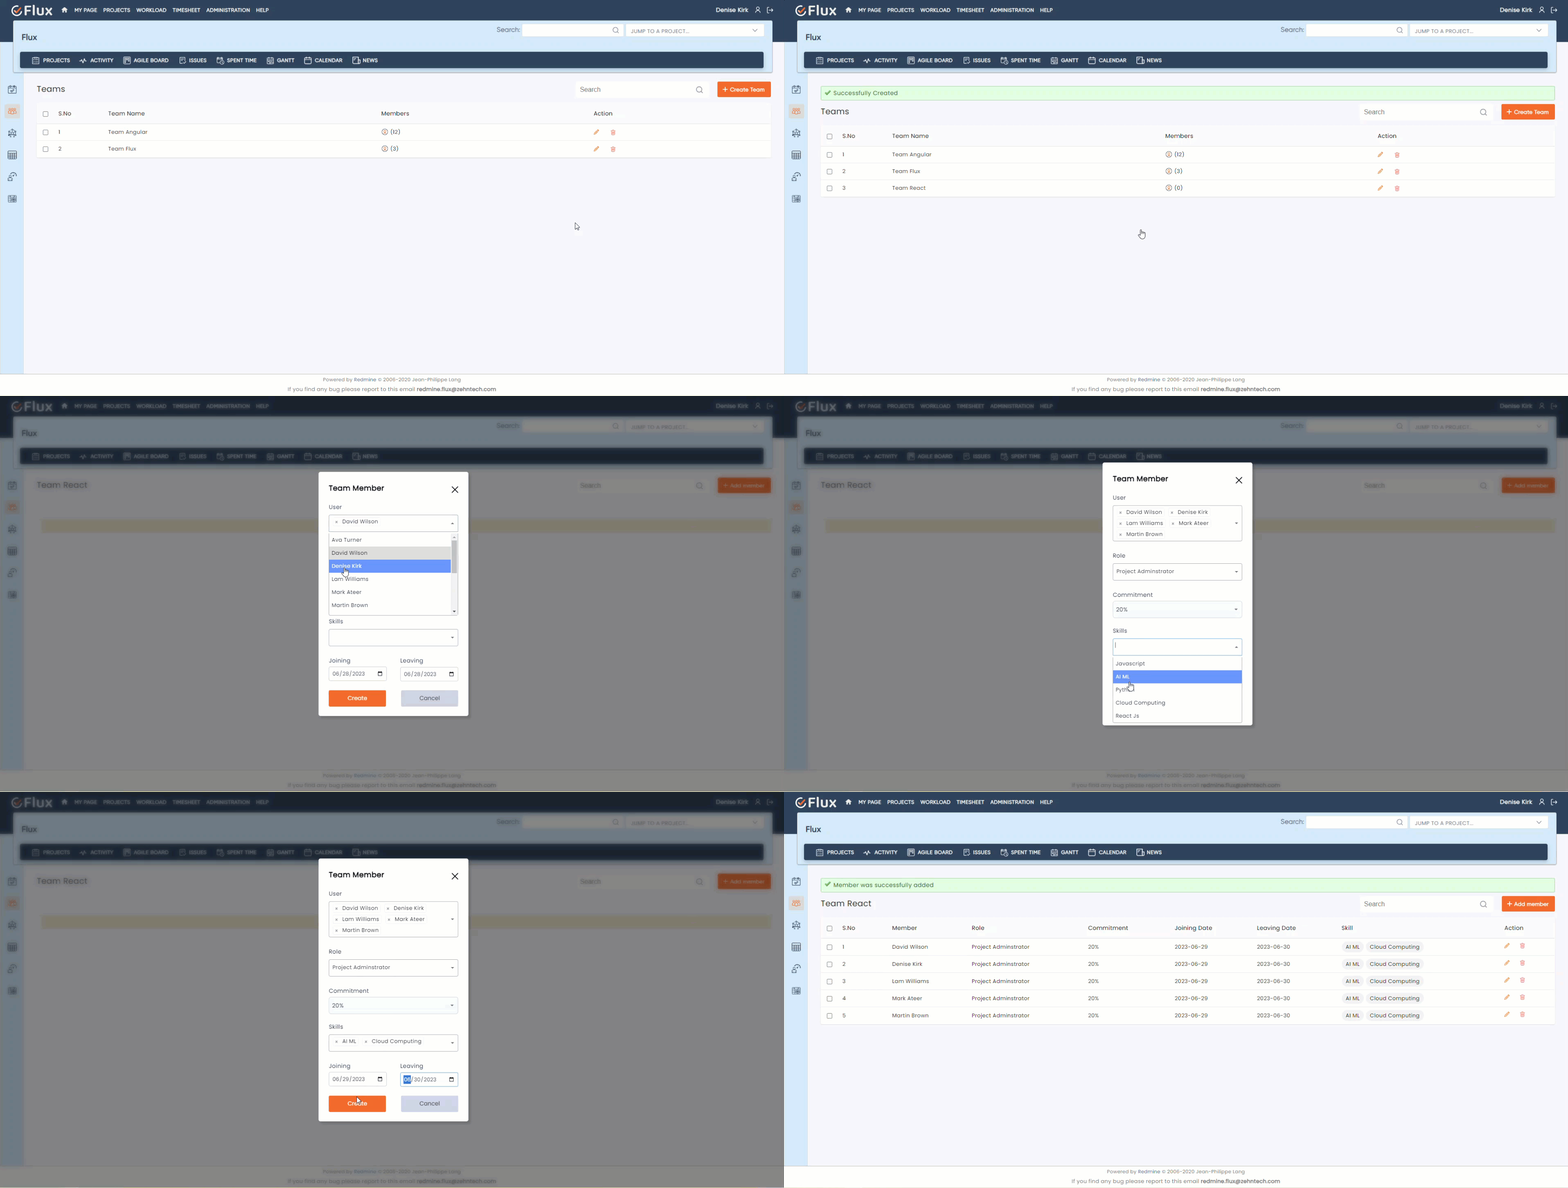
How to Create a Team in Redmineflux Workload #
To create a team in Redmineflux Workload, follow these steps
- Access the administration settings of Redmineflux Workload.
- Navigate to the team management section.
- Look for the option to create a new team.
- Click on the “Create Team” button to initiate the team creation process.
- Provide a name for the team to easily identify it.
- Configure additional settings or properties for the team, such as assigning team members or defining team-specific roles.
- Save the newly created team.
- To add members to the teams click on the “Members” icon.
- Click on the “Add Members” button to add members to the team.
- To remove members from the team, click on the “Delete” icon.
By creating a team in Redmineflux, you can group and organize resources together, enabling efficient management of workload and task assignments within your project or organization. This facilitates better collaboration and coordination among team members, leading to improved productivity and resource utilization.

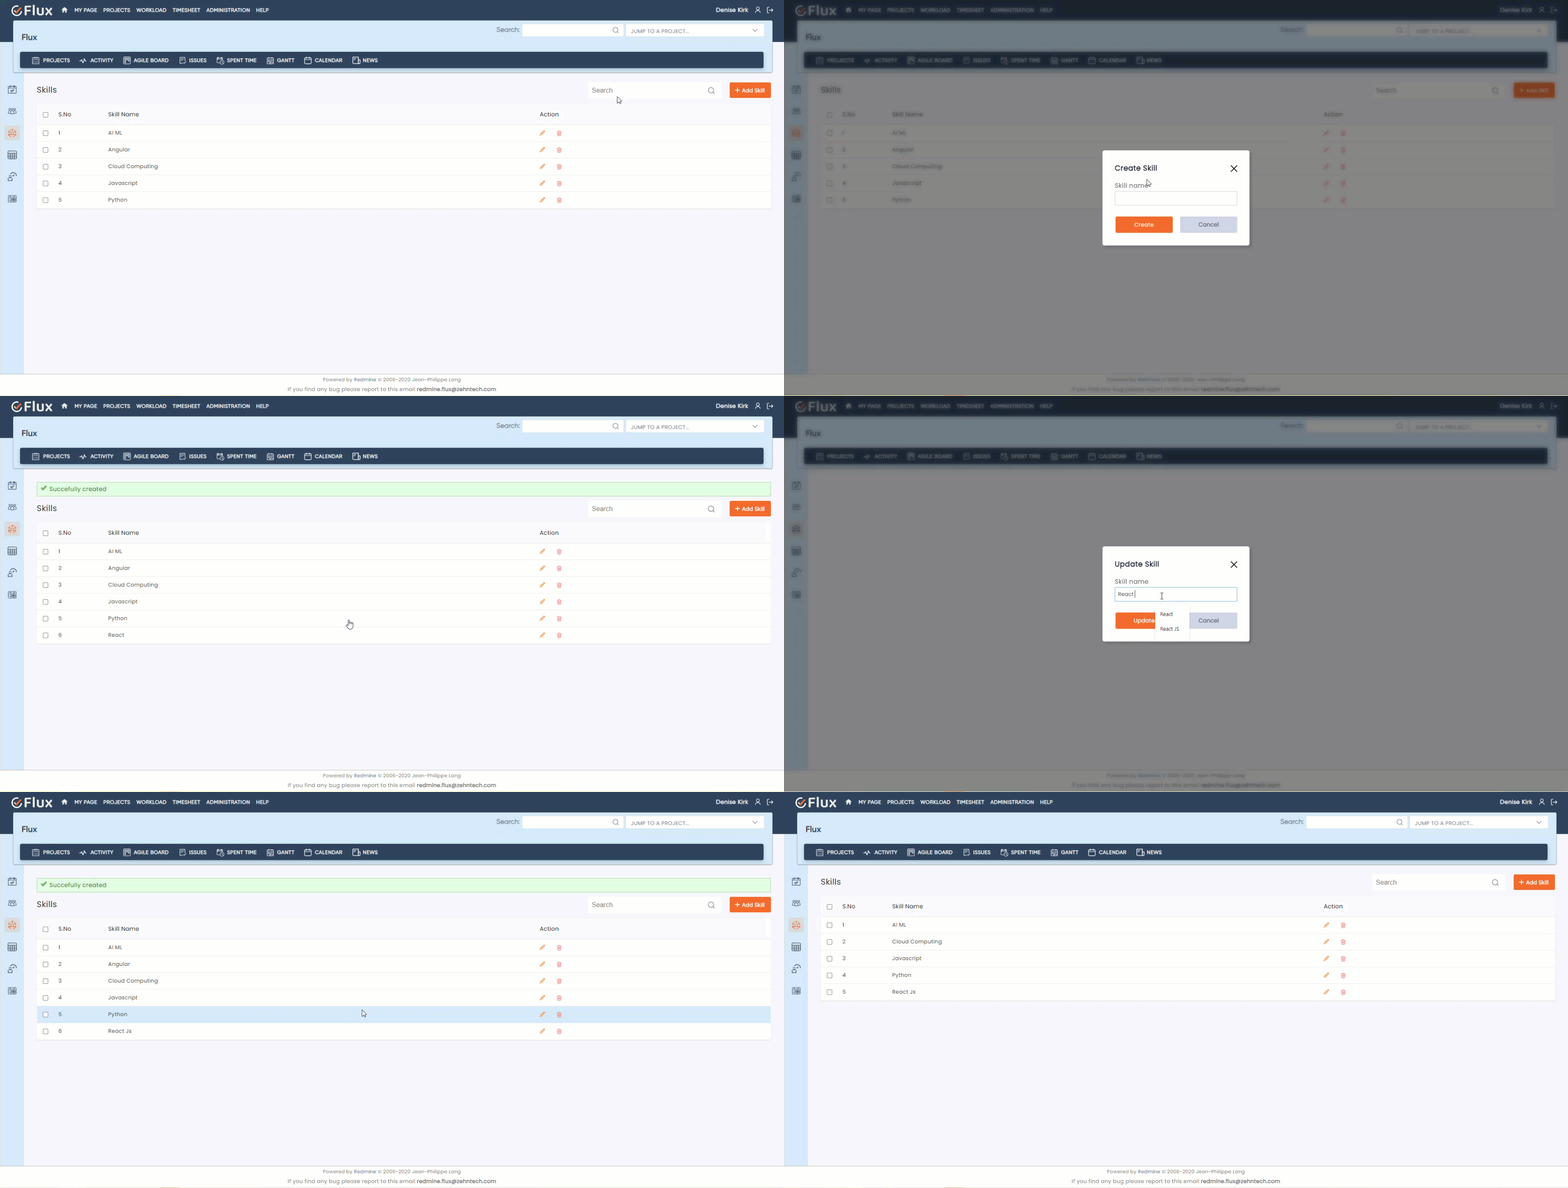
How to Create Skills for Resources in Redmineflux Workload #
To create skills for resources in Redmineflux Workload, follow these steps:
- Access the administration settings of Redmineflux Workload.
- Navigate to the skills management section.
- Look for the option to add a new skill.
- Click on the “Add Skills” button to start creating a new skill.
- Provide a name for the skill to easily identify it.
- Save the newly created skill.
Once the skills are created, you can associate them with individual resources in Redmineflux Workload. This allows for efficient resource allocation and task assignment based on the specific skills required for each task. By creating and managing skills for resources, you can enhance resource planning and ensure that the right resources with the appropriate skills are assigned to relevant tasks within your project or organization.

Troubleshooting #
1. Plugin Installation Issues
Issue: The plugin fails to install or shows an error during installation.
Solution:
1. Make sure the plugin is compatible with your Redmine version.
2. Verify that you have the necessary permissions to install plugins.
3. Check the plugin’s documentation or support channels for any specific installation instructions or requirements.
4. Restart your Redmine instance and try reinstalling the plugin.
2. Configuration Issues
Issue: The plugin settings are not applied or have no effect.
Solution:
1. Double-check the configuration settings to ensure they are correctly defined.
2. Verify that the configuration changes were saved successfully.
3. Restart your Redmine instance after making configuration changes.
4. Clear your browser cache and try accessing the plugin again.
3. Workload View Issues
Issue: The workload view is not displaying any data or shows incorrect information.
Solution:
1. Check if there are any filters applied that might be excluding the desired data.
2. Remove or adjust the filters accordingly.
3. Ensure that the selected time period is appropriate and aligns with the expected workload data.
4. Verify that the users or projects you expect to see in the workload view have assigned issues.
5. Confirm that the issues have the correct estimated time and remaining time values set.
6. If using custom fields or trackers, ensure they are configured correctly for workload calculations.
4. Performance Issues
Issue: The workload plugin slows down the Redmine instance or causes performance issues.
Solution:
1. Ensure that your Redmine server meets the recommended system requirements.
2. Check if there are any other plugins or customizations that could conflict with the workload plugin. Disable or remove any conflicting components.
3. If you have a large number of issues or users, consider adjusting the workload view’s time period to a smaller interval for improved performance.
4. If the performance issues persist, contact the plugin’s support community or consult the plugin’s documentation for additional guidance.
5. Compatibility Issues
Issue: The workload plugin is not compatible with other Redmine plugins or themes.
Solution:
1. Check the plugin’s documentation for information about compatibility with other plugins or themes.
2. Disable other plugins temporarily to identify any conflicts. 3. Enable them one by one to determine which one is causing the compatibility issue.
4. If the issue involves a theme, try switching to a default Redmine theme to see if the problem persists.
5. Contact the plugin developers or the support community for further assistance regarding compatibility issues.
Frequently Asked Questions (FAQ’s) #
Q1: What is the Workload Plugin in Redmine?
A:1 The Workload Plugin is a powerful tool that allows you to manage and visualize workloads in Redmine. It provides an overview of workload distribution across projects and team members, helping you effectively allocate resources and track progress.
Q2: How can I view the workload in the Workload Plugin?
A:2 To view the workload, navigate to the “Workload” tab in the main menu. By default, the workload view displays the workload distribution by users. You can use the drop-down menu to select the desired view (by team or by custom date range). The workload is represented using a color-coded matrix, with each cell indicating the workload intensity for a specific user.
Q3: Can I filter the workload view in the Workload Plugin?
A:3 Yes, you can filter the workload view. Click on the “Date Range Picker” in the Workload Plugin interface and specify the filter criteria based on task duration. Clicking on the “Apply” button will update the workload view according to the applied filters.
Q4: Can I export the workload data from the Workload Plugin?
A:4 Yes, the Workload Plugin allows you to export the workload data for further analysis or reporting. Click on the “Export” button in the plugin interface, save the exported file to your local machine.
Q5: What should I do if I encounter issues with the Workload Plugin?
A:5 If you encounter issues with the Workload Plugin, refer to the troubleshooting guide provided in the plugin’s documentation. It covers common issues and solutions related to installation, configuration, workload view, performance, and compatibility. If the issue persists, reach out to the plugin’s support community or developers for further assistance.
These FAQs should address some common questions you may have regarding the Workload Plugin in Redmine. If you have any additional queries, feel free to ask the support community or consult the plugin’s documentation for more information.
Uninstallation of Plugin #
To uninstall the Redmineflux Workload plugin, follow these steps
- Go to the Workload plugin directory in Redmine.
- Delete the entire Workload directory from Redmine/plugins directory. This step removes the plugin files from your Redmine installation.
- If the plugin required a migration, run the following command to downgrade your database (make a db backup before):
Bundle exec rake redmine:plugins:migrate Name=plugin name VERSION=0
- Restart the Redmine server to see the changes.
- This will uninstall the Redmineflux Workload plugin from Redmine.
Conclusion
A Workload plugin/resource plugin offers several key advantages. Firstly, it enables organizations to gain a comprehensive overview of their workloads and resources, facilitating better planning and allocation. This allows for a more balanced distribution of tasks and resources, minimizing bottlenecks and maximizing productivity.
Daisy Redmine Theme
Scarlet Redmine Theme
All Plugins Combo
Project Management Combo
Redmine Essential Plugin Combo
Plugins
Redmine Implementation & Support Services
Cloud Redmine
Redmine Themes
Plugins
Plugin Combo
Cloud Redmine
Themes

About Us
Blog
Testimonials
Knowledgebase
Change Log
Use Cases
FAQ’s


